> ## Documentation Index
> Fetch the complete documentation index at: https://lightdash-docs-many-to-many.mintlify.site/llms.txt
> Use this file to discover all available pages before exploring further.
# Sync your changes with Lightdash deploy
## `lightdash deploy` syncs the changes in your dbt project to Lightdash
If you've made some changes to your dbt project and you'd like to make them available in your Lightdash project, you can easily do this using the `lightdash deploy` command in the Lightdash CLI tool.
```bash
git checkout main # checkout main or master - or whatever your production branch name is where you've merged your changes
git pull
lightdash deploy # --target prod. If you use developer profiles in your dbt project, you might need this flag. See below.
```
This will deploy the changes in your dbt project to the Lightdash project you set up on your CLI tool earlier.
**Lightdash's deploy command will deploy using your **default dbt profile** unless you specify to use a different target.**
For example, if you've set up a developer profile where it targets a dev dataset (like `dbt_khindson.my_model_names`), then you'll need to pass the production target in your `lightdash deploy` command. Something like: `lightdash deploy --profile prod`.
And voilà! Once it's completed click the URL to head straight to your project where your changes will be ready to be explored.
## Automatically deploy your changes to Lightdash using a GitHub action
If you've connected Lightdash to GitHub, you can setup a `github action` and get Lightdash to deploy your project automatically. This is the easiest way to keep Lightdash in sync with your changes in dbt.
### Step 1: add the credentials to Github secrets
We are going to add some secrets and config to GitHub actions, but you don't want those to be public, so the best way to do this is to add them as secrets on Github.
If you already have a GitHub action for Lightdash, then you can use the same Lightdash secrets you created for your other action.
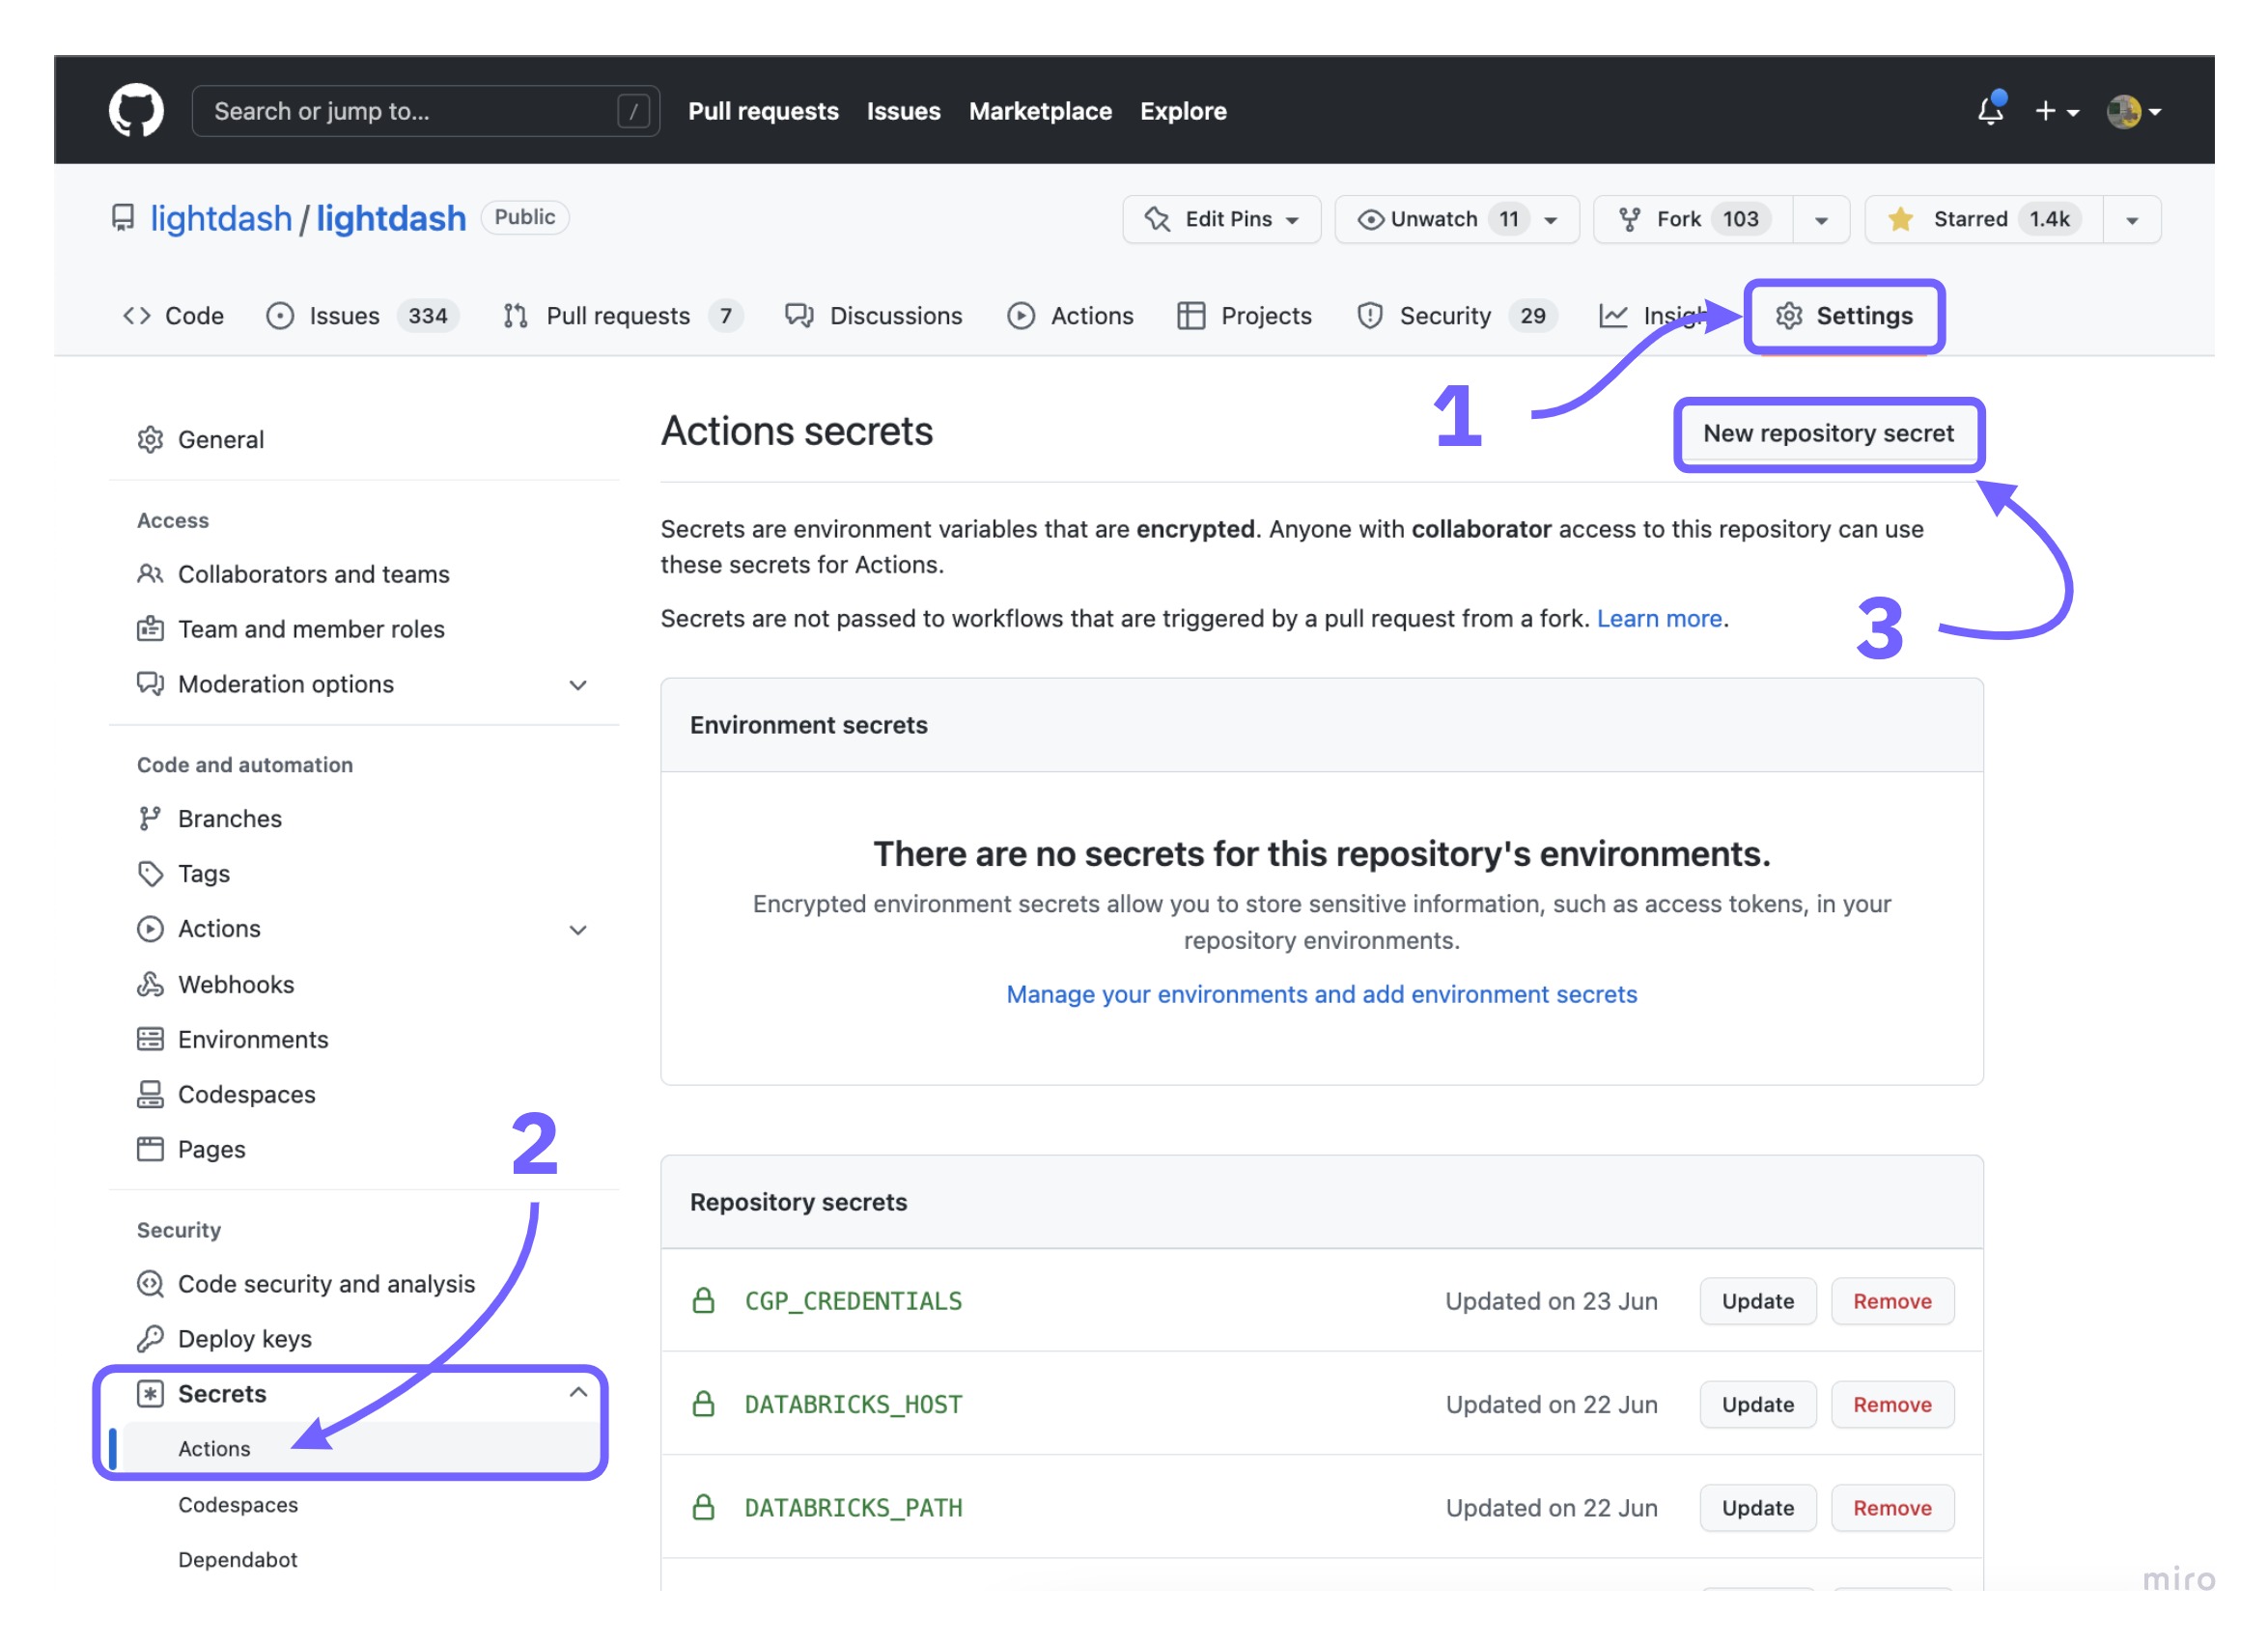
Go to your repo, click on `Settings` , on the left sidebar, click on `Secrets` under `Security`. Now click on the `New repository secret`
 We need to add the following secrets:
##### `LIGHTDASH_API_KEY`
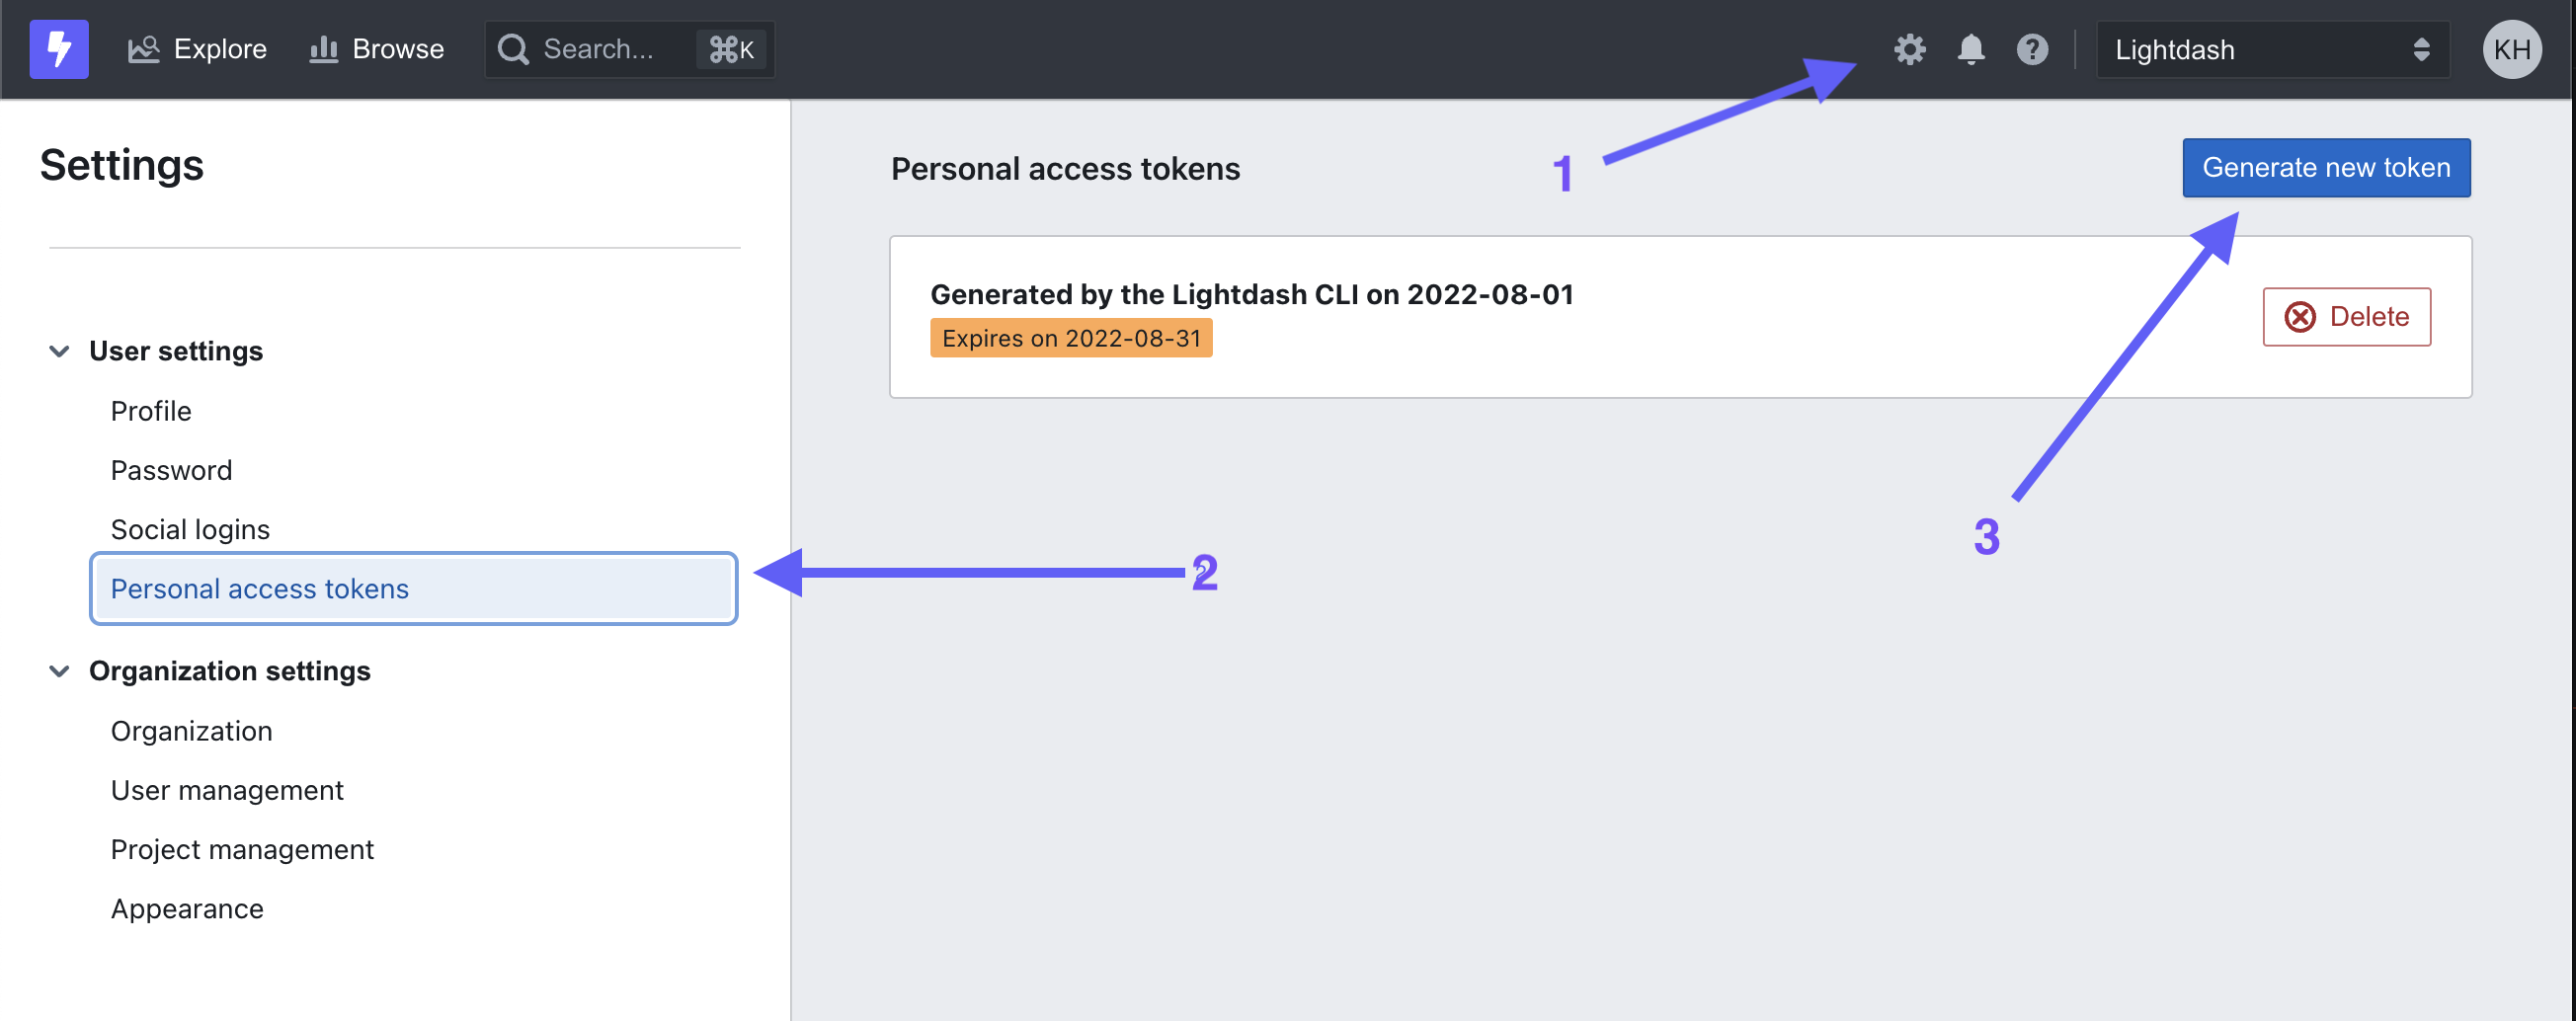
Create a new personal access token, by going to `Settings` > `Personal Access Tokens`. This is the token you'll put in for `LIGHTDASH_API_KEY`.
We need to add the following secrets:
##### `LIGHTDASH_API_KEY`
Create a new personal access token, by going to `Settings` > `Personal Access Tokens`. This is the token you'll put in for `LIGHTDASH_API_KEY`.
 ##### `LIGHTDASH_PROJECT`
The UUID for your project. For example, if your URL looks like `https://eu1.lightdash.cloud/projects/3538ab33-dc90-aabb-bc00-e50bba3a5f69/tables`, then `3538ab33-dc90-45f0-aabb-e50bba3a5f69` is your `LIGHTDASH_PROJECT`
##### `LIGHTDASH_URL`
This is either `https://eu1.lightdash.cloud` or `https://app.lightdash.cloud` for Lightdash Cloud users (check the URL to your Lightdash project). If you self-host, this should be your own custom domain.
##### `DBT_PROFILES`
Some tips for this bit:
* You might be able to copy a bunch of the information from your local `profiles.yml` file. You can see what's in there by typing `cat ~/.dbt/profiles.yml` in your terminal.
* If you have a separate `prod` and `dev` profile, you probably want to use the information from your `prod` profile for your GitHub action.
* If you want to have different connection settings depending on the user that opened the pull request (dev profiles), then [check out this guide](/guides/cli/how-to-use-lightdash-preview#how-to-use-the-developer-credentials-in-your-preview-project).
Find your data warehouse from the list below to get a profiles.yml file template. Fill out this template, and this is your `DBT_PROFILES` secret.
BigQuery OAuth:
Step 1: create a secret called `GOOGLE_APPLICATION_CREDENTIALS`
Add the service account credentials (the JSON file) that you want to use for your GitHub action. It should look something like this:
```yaml
{
"type": "service_account",
"project_id": "jaffle_shop",
"private_key_id": "12345",
"private_key": "-----BEGIN PRIVATE KEY----- ... -----END PRIVATE KEY-----\n",
"client_email": "jaffle_shop@jaffle_shop.iam.gserviceaccount.com",
"client_id": "12345",
"auth_uri": "https://accounts.google.com/o/oauth2/auth",
"token_uri": "https://oauth2.googleapis.com/token",
"auth_provider_x509_cert_url": "https://www.googleapis.com/oauth2/v1/certs",
"client_x509_cert_url": "https://www.googleapis.com/robot/v1/metadata/x509/jaffle_shop"
}
```
Step 2: create another secret called `DBT_PROFILES`
Copy-paste this template into the secret and fill out the details.
This will always use this project connection in your GitHub actions. If you want your preview projects to have different connection settings depending on the user that opened the pull request (dev profiles), then see what you need to add to your secret [in this guide](/guides/cli/how-to-use-lightdash-preview#how-to-use-the-developer-credentials-in-your-preview-project).
```yaml
[my-bigquery-db]: # this is the name of your project
target: dev
outputs:
dev:
type: bigquery
method: oauth
keyfile: keyfile.json # no need to change this! We'll automatically use the keyfile you created in the last step.
project: [GCP project id]
dataset: [the name of your dbt dataset]
```
More info in dbt's profiles docs: [https://docs.getdbt.com/reference/warehouse-profiles/bigquery-profile#service-account-file](https://docs.getdbt.com/reference/warehouse-profiles/bigquery-profile#service-account-file)
Postgres profile configuration:
```yaml
company-name:
target: dev
outputs:
dev:
type: postgres
host: [hostname]
user: [username]
password: [password]
port: [port]
dbname: [database name]
schema: [dbt schema]
threads: [1 or more]
keepalives_idle: 0
connect_timeout: 10
retries: 1
```
More info in dbt's profiles docs: [https://docs.getdbt.com/reference/warehouse-profiles/postgres-profile#profile-configuration](https://docs.getdbt.com/reference/warehouse-profiles/postgres-profile#profile-configuration)
This will always use this project connection in your GitHub actions. If you want your preview projects to have different connection settings depending on the user that opened the pull request (dev profiles), then see what you need to add to your secret [in this guide](/guides/cli/how-to-use-lightdash-preview#how-to-use-the-developer-credentials-in-your-preview-project).
Redshift password-based authentication:
```yaml
company-name:
target: dev
outputs:
dev:
type: redshift
host: [hostname.region.redshift.amazonaws.com]
user: [username]
password: [password]
port: 5439
dbname: analytics
schema: analytics
threads: 4
keepalives_idle: 240
connect_timeout: 10
ra3_node: true # enables cross-database sources
```
More info in dbt's profiles docs: [https://docs.getdbt.com/reference/warehouse-profiles/redshift-profile#password-based-authentication](https://docs.getdbt.com/reference/warehouse-profiles/redshift-profile#password-based-authentication)
This will always use this project connection in your GitHub actions. If you want your preview projects to have different connection settings depending on the user that opened the pull request (dev profiles), then see what you need to add to your secret [in this guide](/guides/cli/how-to-use-lightdash-preview#how-to-use-the-developer-credentials-in-your-preview-project).
User / Password authentication:
```yaml
my-snowflake-db:
target: dev
outputs:
dev:
type: snowflake
account: [account id]
# User/password auth
user: [username]
password: [password]
role: [user role]
database: [database name]
warehouse: [warehouse name]
schema: [dbt schema]
threads: [1 or more]
client_session_keep_alive: False
query_tag: [anything]
```
More info in dbt's profiles docs: [https://docs.getdbt.com/reference/warehouse-profiles/snowflake-profile#user--password-authentication](https://docs.getdbt.com/reference/warehouse-profiles/snowflake-profile#user--password-authentication)
This will always use this project connection in your GitHub actions. If you want your preview projects to have different connection settings depending on the user that opened the pull request (dev profiles), then see what you need to add to your secret [in this guide](/guides/cli/how-to-use-lightdash-preview#how-to-use-the-developer-credentials-in-your-preview-project).
Set up a DataBricks target:
```yaml
your_profile_name:
target: dev
outputs:
dev:
type: databricks
catalog:
[
optional catalog name,
if you are using Unity Catalog,
only available in dbt-databricks>=1.1.1,
]
schema: [schema name]
host: [yourorg.databrickshost.com]
http_path: [/sql/your/http/path]
token: [dapiXXXXXXXXXXXXXXXXXXXXXXX] # Personal Access Token (PAT)
threads: [1 or more]
```
More info in dbt's profiles docs: [https://docs.getdbt.com/reference/warehouse-profiles/bigquery-profile#service-account-json](https://docs.getdbt.com/reference/warehouse-profiles/bigquery-profile#service-account-json)
This will always use this project connection in your GitHub actions. If you want your preview projects to have different connection settings depending on the user that opened the pull request (dev profiles), then see what you need to add to your secret [in this guide](/guides/cli/how-to-use-lightdash-preview#how-to-use-the-developer-credentials-in-your-preview-project).
### Step 2: Create deploy.yml workflow in Github
Go to your repo, click on `Actions` menu.
If you don't have any GitHub actions, you'll just need to click on `Configure`
##### `LIGHTDASH_PROJECT`
The UUID for your project. For example, if your URL looks like `https://eu1.lightdash.cloud/projects/3538ab33-dc90-aabb-bc00-e50bba3a5f69/tables`, then `3538ab33-dc90-45f0-aabb-e50bba3a5f69` is your `LIGHTDASH_PROJECT`
##### `LIGHTDASH_URL`
This is either `https://eu1.lightdash.cloud` or `https://app.lightdash.cloud` for Lightdash Cloud users (check the URL to your Lightdash project). If you self-host, this should be your own custom domain.
##### `DBT_PROFILES`
Some tips for this bit:
* You might be able to copy a bunch of the information from your local `profiles.yml` file. You can see what's in there by typing `cat ~/.dbt/profiles.yml` in your terminal.
* If you have a separate `prod` and `dev` profile, you probably want to use the information from your `prod` profile for your GitHub action.
* If you want to have different connection settings depending on the user that opened the pull request (dev profiles), then [check out this guide](/guides/cli/how-to-use-lightdash-preview#how-to-use-the-developer-credentials-in-your-preview-project).
Find your data warehouse from the list below to get a profiles.yml file template. Fill out this template, and this is your `DBT_PROFILES` secret.
BigQuery OAuth:
Step 1: create a secret called `GOOGLE_APPLICATION_CREDENTIALS`
Add the service account credentials (the JSON file) that you want to use for your GitHub action. It should look something like this:
```yaml
{
"type": "service_account",
"project_id": "jaffle_shop",
"private_key_id": "12345",
"private_key": "-----BEGIN PRIVATE KEY----- ... -----END PRIVATE KEY-----\n",
"client_email": "jaffle_shop@jaffle_shop.iam.gserviceaccount.com",
"client_id": "12345",
"auth_uri": "https://accounts.google.com/o/oauth2/auth",
"token_uri": "https://oauth2.googleapis.com/token",
"auth_provider_x509_cert_url": "https://www.googleapis.com/oauth2/v1/certs",
"client_x509_cert_url": "https://www.googleapis.com/robot/v1/metadata/x509/jaffle_shop"
}
```
Step 2: create another secret called `DBT_PROFILES`
Copy-paste this template into the secret and fill out the details.
This will always use this project connection in your GitHub actions. If you want your preview projects to have different connection settings depending on the user that opened the pull request (dev profiles), then see what you need to add to your secret [in this guide](/guides/cli/how-to-use-lightdash-preview#how-to-use-the-developer-credentials-in-your-preview-project).
```yaml
[my-bigquery-db]: # this is the name of your project
target: dev
outputs:
dev:
type: bigquery
method: oauth
keyfile: keyfile.json # no need to change this! We'll automatically use the keyfile you created in the last step.
project: [GCP project id]
dataset: [the name of your dbt dataset]
```
More info in dbt's profiles docs: [https://docs.getdbt.com/reference/warehouse-profiles/bigquery-profile#service-account-file](https://docs.getdbt.com/reference/warehouse-profiles/bigquery-profile#service-account-file)
Postgres profile configuration:
```yaml
company-name:
target: dev
outputs:
dev:
type: postgres
host: [hostname]
user: [username]
password: [password]
port: [port]
dbname: [database name]
schema: [dbt schema]
threads: [1 or more]
keepalives_idle: 0
connect_timeout: 10
retries: 1
```
More info in dbt's profiles docs: [https://docs.getdbt.com/reference/warehouse-profiles/postgres-profile#profile-configuration](https://docs.getdbt.com/reference/warehouse-profiles/postgres-profile#profile-configuration)
This will always use this project connection in your GitHub actions. If you want your preview projects to have different connection settings depending on the user that opened the pull request (dev profiles), then see what you need to add to your secret [in this guide](/guides/cli/how-to-use-lightdash-preview#how-to-use-the-developer-credentials-in-your-preview-project).
Redshift password-based authentication:
```yaml
company-name:
target: dev
outputs:
dev:
type: redshift
host: [hostname.region.redshift.amazonaws.com]
user: [username]
password: [password]
port: 5439
dbname: analytics
schema: analytics
threads: 4
keepalives_idle: 240
connect_timeout: 10
ra3_node: true # enables cross-database sources
```
More info in dbt's profiles docs: [https://docs.getdbt.com/reference/warehouse-profiles/redshift-profile#password-based-authentication](https://docs.getdbt.com/reference/warehouse-profiles/redshift-profile#password-based-authentication)
This will always use this project connection in your GitHub actions. If you want your preview projects to have different connection settings depending on the user that opened the pull request (dev profiles), then see what you need to add to your secret [in this guide](/guides/cli/how-to-use-lightdash-preview#how-to-use-the-developer-credentials-in-your-preview-project).
User / Password authentication:
```yaml
my-snowflake-db:
target: dev
outputs:
dev:
type: snowflake
account: [account id]
# User/password auth
user: [username]
password: [password]
role: [user role]
database: [database name]
warehouse: [warehouse name]
schema: [dbt schema]
threads: [1 or more]
client_session_keep_alive: False
query_tag: [anything]
```
More info in dbt's profiles docs: [https://docs.getdbt.com/reference/warehouse-profiles/snowflake-profile#user--password-authentication](https://docs.getdbt.com/reference/warehouse-profiles/snowflake-profile#user--password-authentication)
This will always use this project connection in your GitHub actions. If you want your preview projects to have different connection settings depending on the user that opened the pull request (dev profiles), then see what you need to add to your secret [in this guide](/guides/cli/how-to-use-lightdash-preview#how-to-use-the-developer-credentials-in-your-preview-project).
Set up a DataBricks target:
```yaml
your_profile_name:
target: dev
outputs:
dev:
type: databricks
catalog:
[
optional catalog name,
if you are using Unity Catalog,
only available in dbt-databricks>=1.1.1,
]
schema: [schema name]
host: [yourorg.databrickshost.com]
http_path: [/sql/your/http/path]
token: [dapiXXXXXXXXXXXXXXXXXXXXXXX] # Personal Access Token (PAT)
threads: [1 or more]
```
More info in dbt's profiles docs: [https://docs.getdbt.com/reference/warehouse-profiles/bigquery-profile#service-account-json](https://docs.getdbt.com/reference/warehouse-profiles/bigquery-profile#service-account-json)
This will always use this project connection in your GitHub actions. If you want your preview projects to have different connection settings depending on the user that opened the pull request (dev profiles), then see what you need to add to your secret [in this guide](/guides/cli/how-to-use-lightdash-preview#how-to-use-the-developer-credentials-in-your-preview-project).
### Step 2: Create deploy.yml workflow in Github
Go to your repo, click on `Actions` menu.
If you don't have any GitHub actions, you'll just need to click on `Configure`
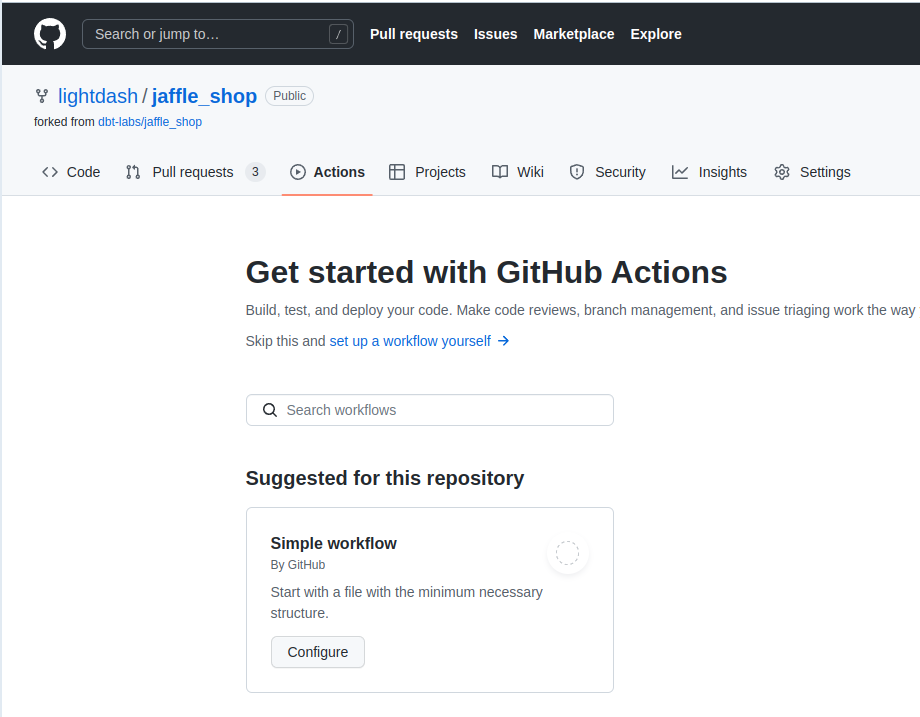 If you have some GitHub actions in your repo already, click on `New workflow`, then select `setup a workflow yourself`.
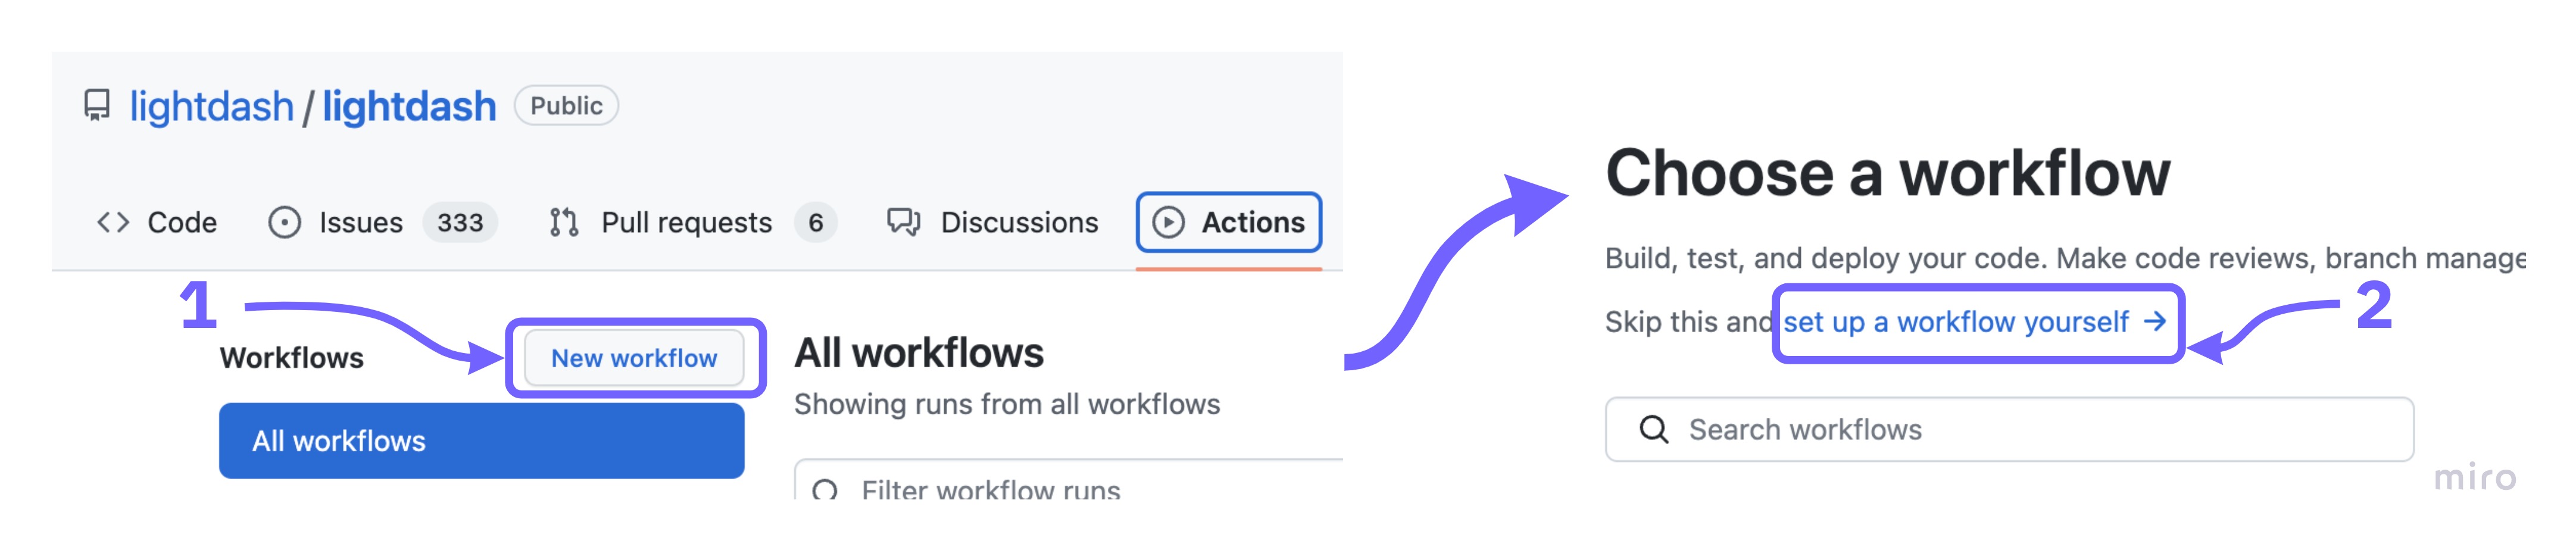 Now copy [this file](https://github.com/lightdash/cli-actions/blob/main/deploy.yml) from our [cli-actions](https://github.com/lightdash/cli-actions) repo.
Give it a nice name like `deploy-lightdash.yml`
And commit this to your repo by clicking on `Start commit`.
### You're done!
Everytime you make a change to your repo, on the `main` branch, it will automatically deploy your new config into your Lightdash projects
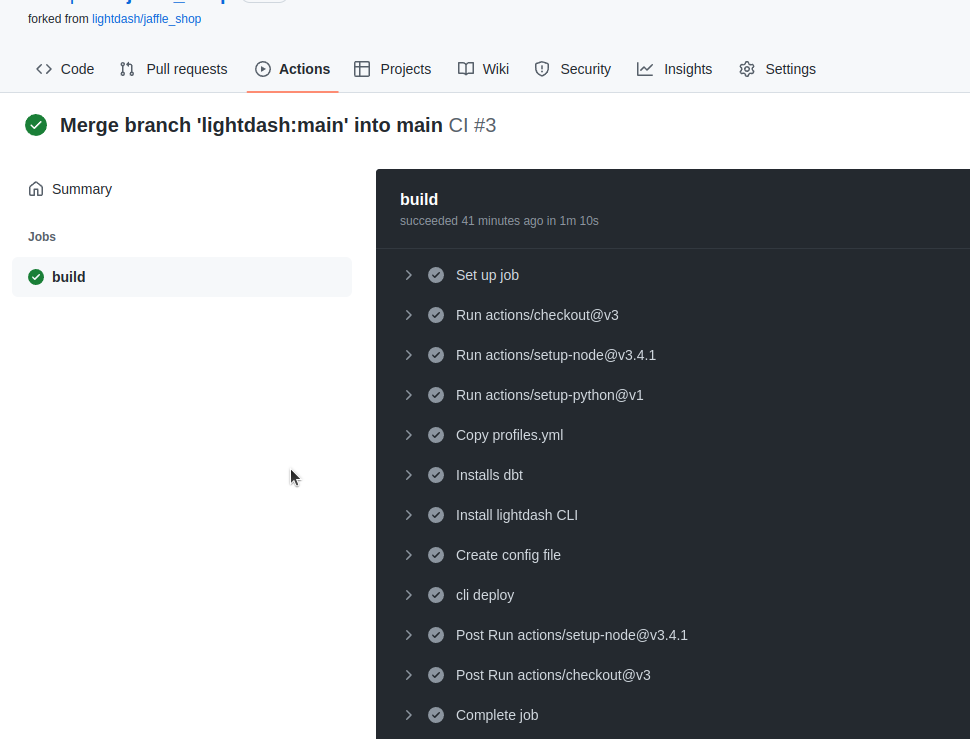
You can see the log on the `Github actions` page
Now copy [this file](https://github.com/lightdash/cli-actions/blob/main/deploy.yml) from our [cli-actions](https://github.com/lightdash/cli-actions) repo.
Give it a nice name like `deploy-lightdash.yml`
And commit this to your repo by clicking on `Start commit`.
### You're done!
Everytime you make a change to your repo, on the `main` branch, it will automatically deploy your new config into your Lightdash projects
You can see the log on the `Github actions` page