> ## Documentation Index
> Fetch the complete documentation index at: https://lightdash-docs-many-to-many.mintlify.site/llms.txt
> Use this file to discover all available pages before exploring further.
# Lightdash Preview
> Preview projects are temporary Lightdash projects where you can safely experiment with your metrics, dimensions and charts without affecting your production project.
Preview projects will copy all spaces/charts/dashboards into your new preview project, so you can test the content and also run [validation](/guides/cli/how-to-use-lightdash-validate). This is only copied on preview creation, you can't sync the content afterwards.
### Run `lightdash preview` from inside your project
```bash
# This will create a preview and will wait until you press a key to delete the preview project
lightdash preview
```
or
```bash
# This will create a preview and exit, you will have to run lightdash stop-preview to delete it
lightdash start-preview
```
Then `cmd` + `click` to open the preview link from your terminal. Once you're in Lightdash go to `Explore` --> `Tables`, then click on the model(s) you just updated to see your changes and play around with them.
**Problems with credentials?**
When you create preview projects, Lightdash will use the same warehouse connection settings you have in your `profiles.yml` file for your current dbt project. This can be a problem if you're using a local database that your laptop can reach but your Lightdash instance cannot.
## Set up developer previews on your pull requests
If you've connected Lightdash to GitHub, you can setup a `github action` and get Lightdash to create new dynamic `preview` projects automatically when a new `pull request` is created, and it will automatically delete the `preview` project when the `pull request` is closed or merged.
### Step 1: add the credentials to Github secrets
If you haven't already set up a GitHub action for Lightdash, you'll need to add some secrets to GitHub. If you already have a GitHub action for Lightdash, then you can use the same Lightdash secrets you created for your other action.
We are going to add some secrets and config to GitHub actions, but you don't want those to be public, so the best way to do this is to add them as secrets on Github.
If you already have a GitHub action for Lightdash, then you can use the same Lightdash secrets you created for your other action.
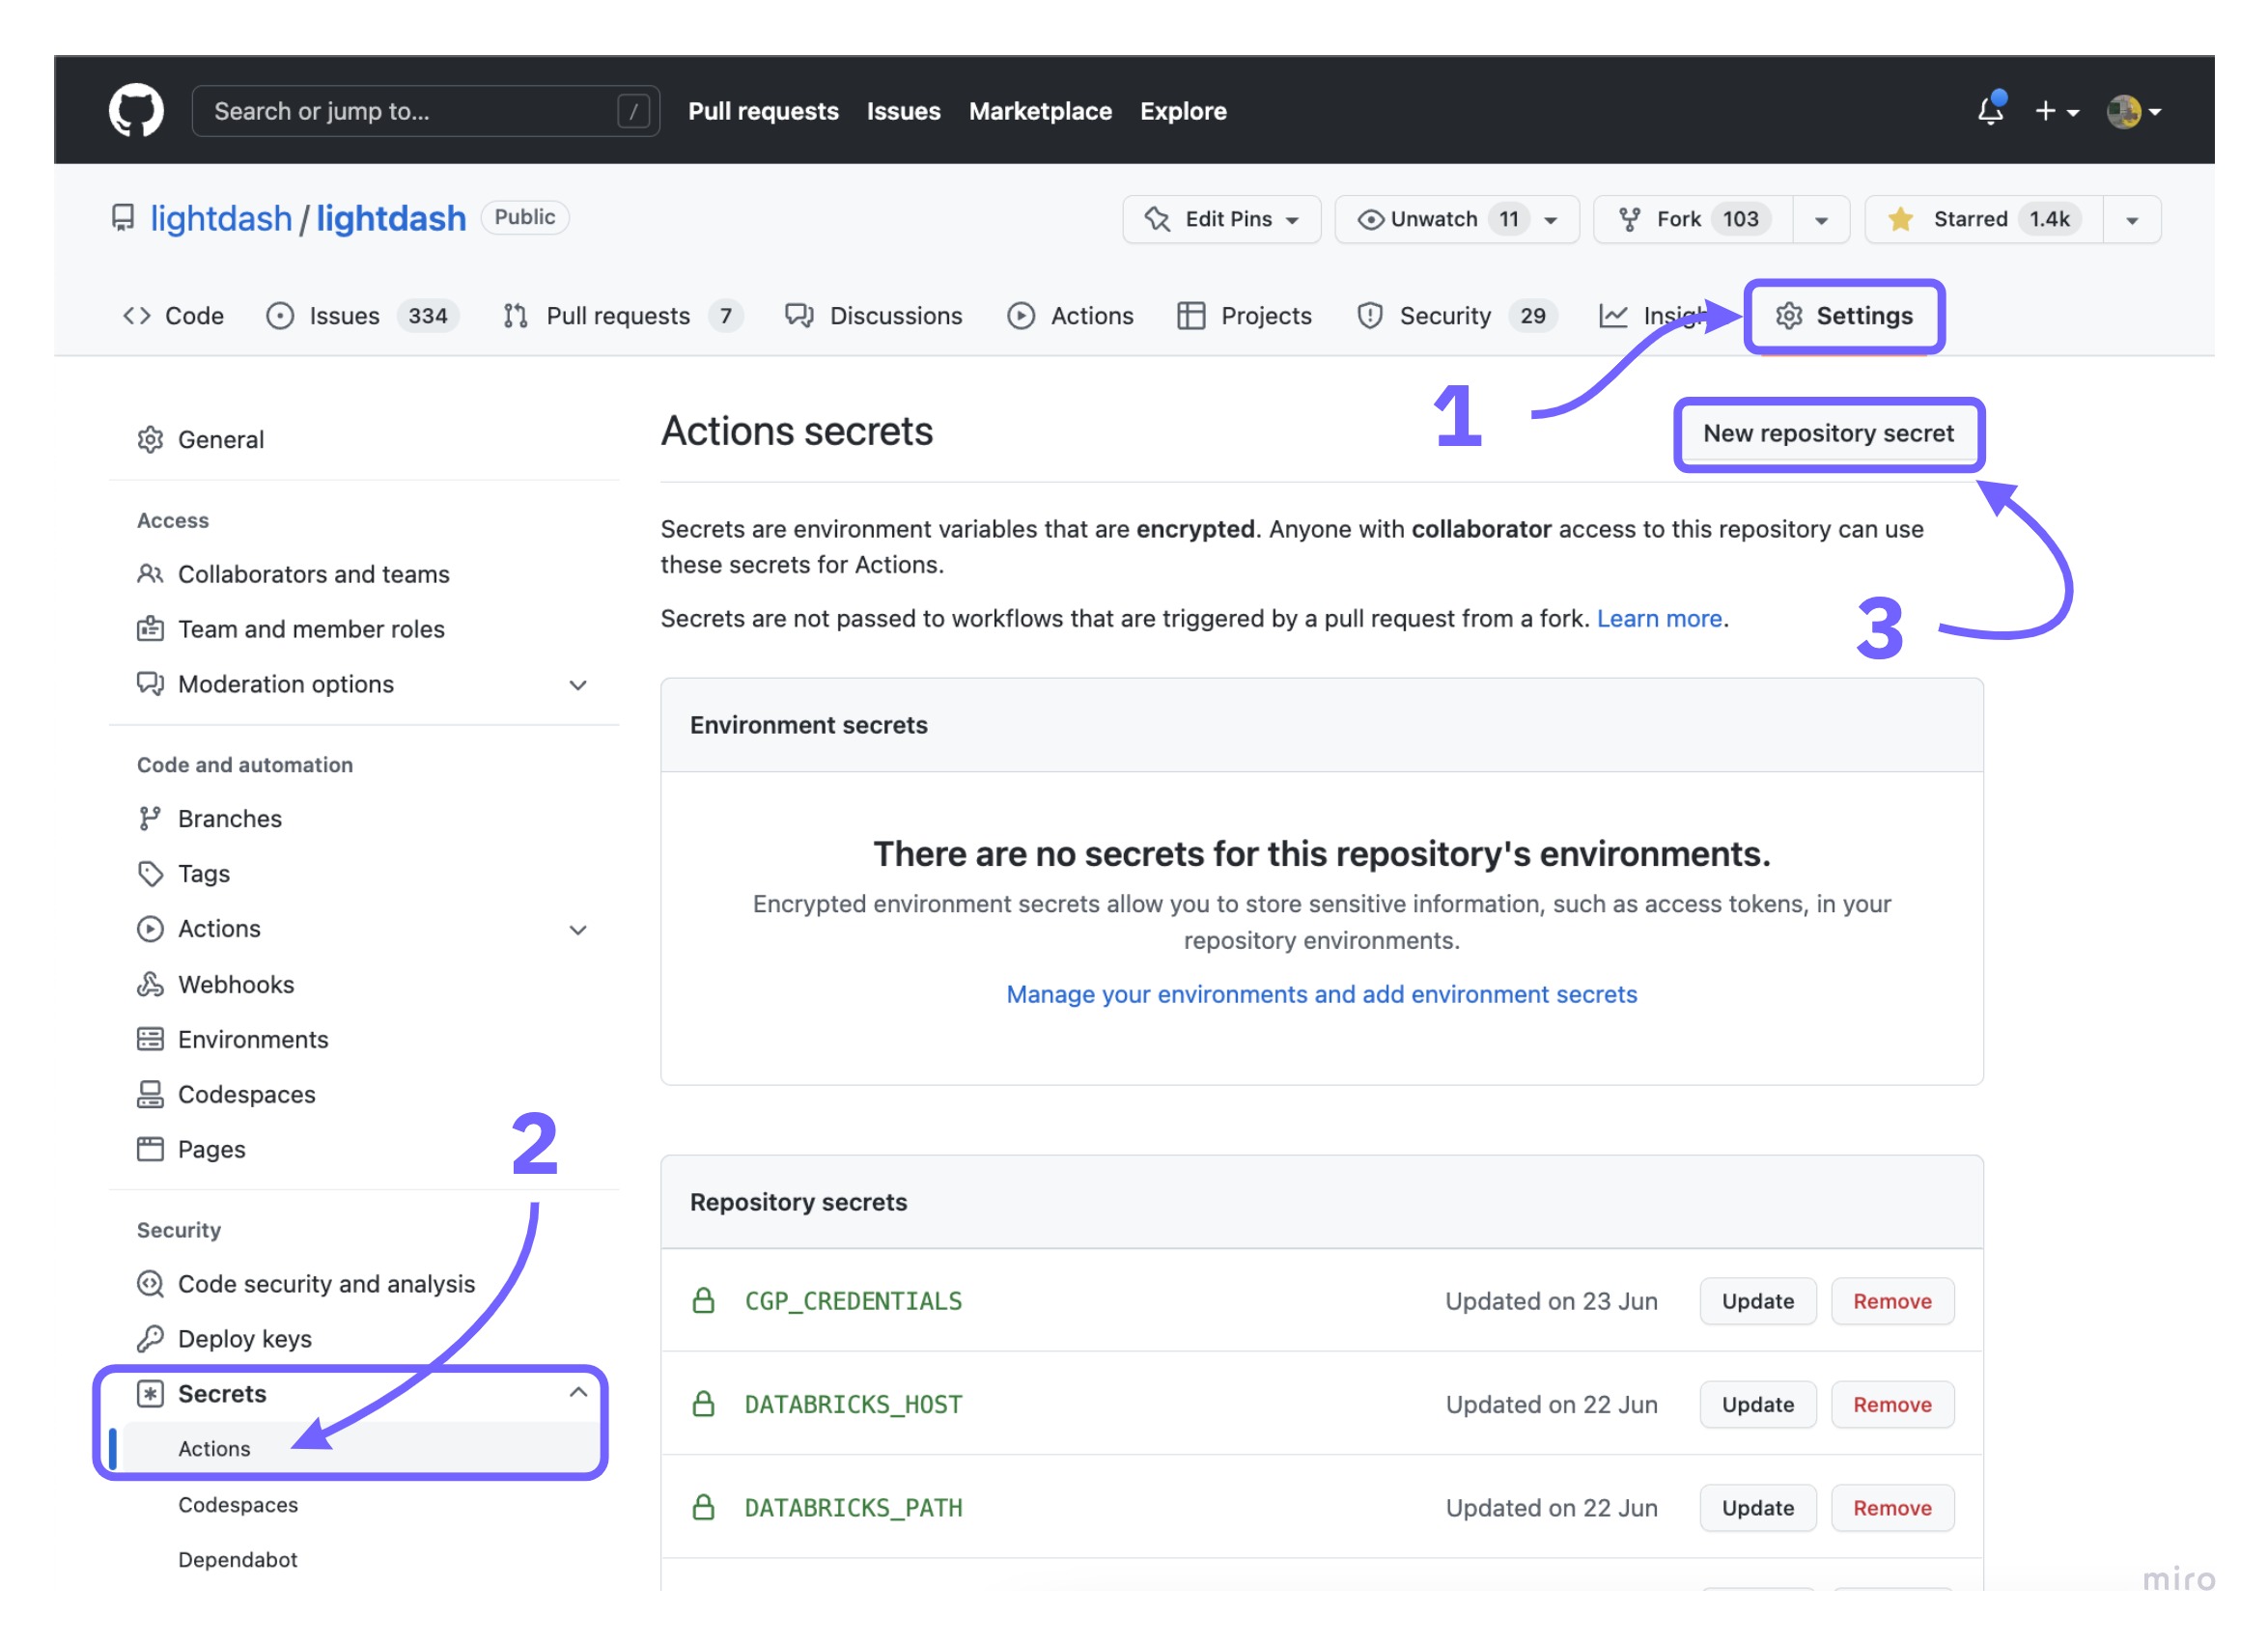
Go to your repo, click on `Settings` , on the left sidebar, click on `Secrets` under `Security`. Now click on the `New repository secret`
 We need to add the following secrets:
##### `LIGHTDASH_API_KEY`
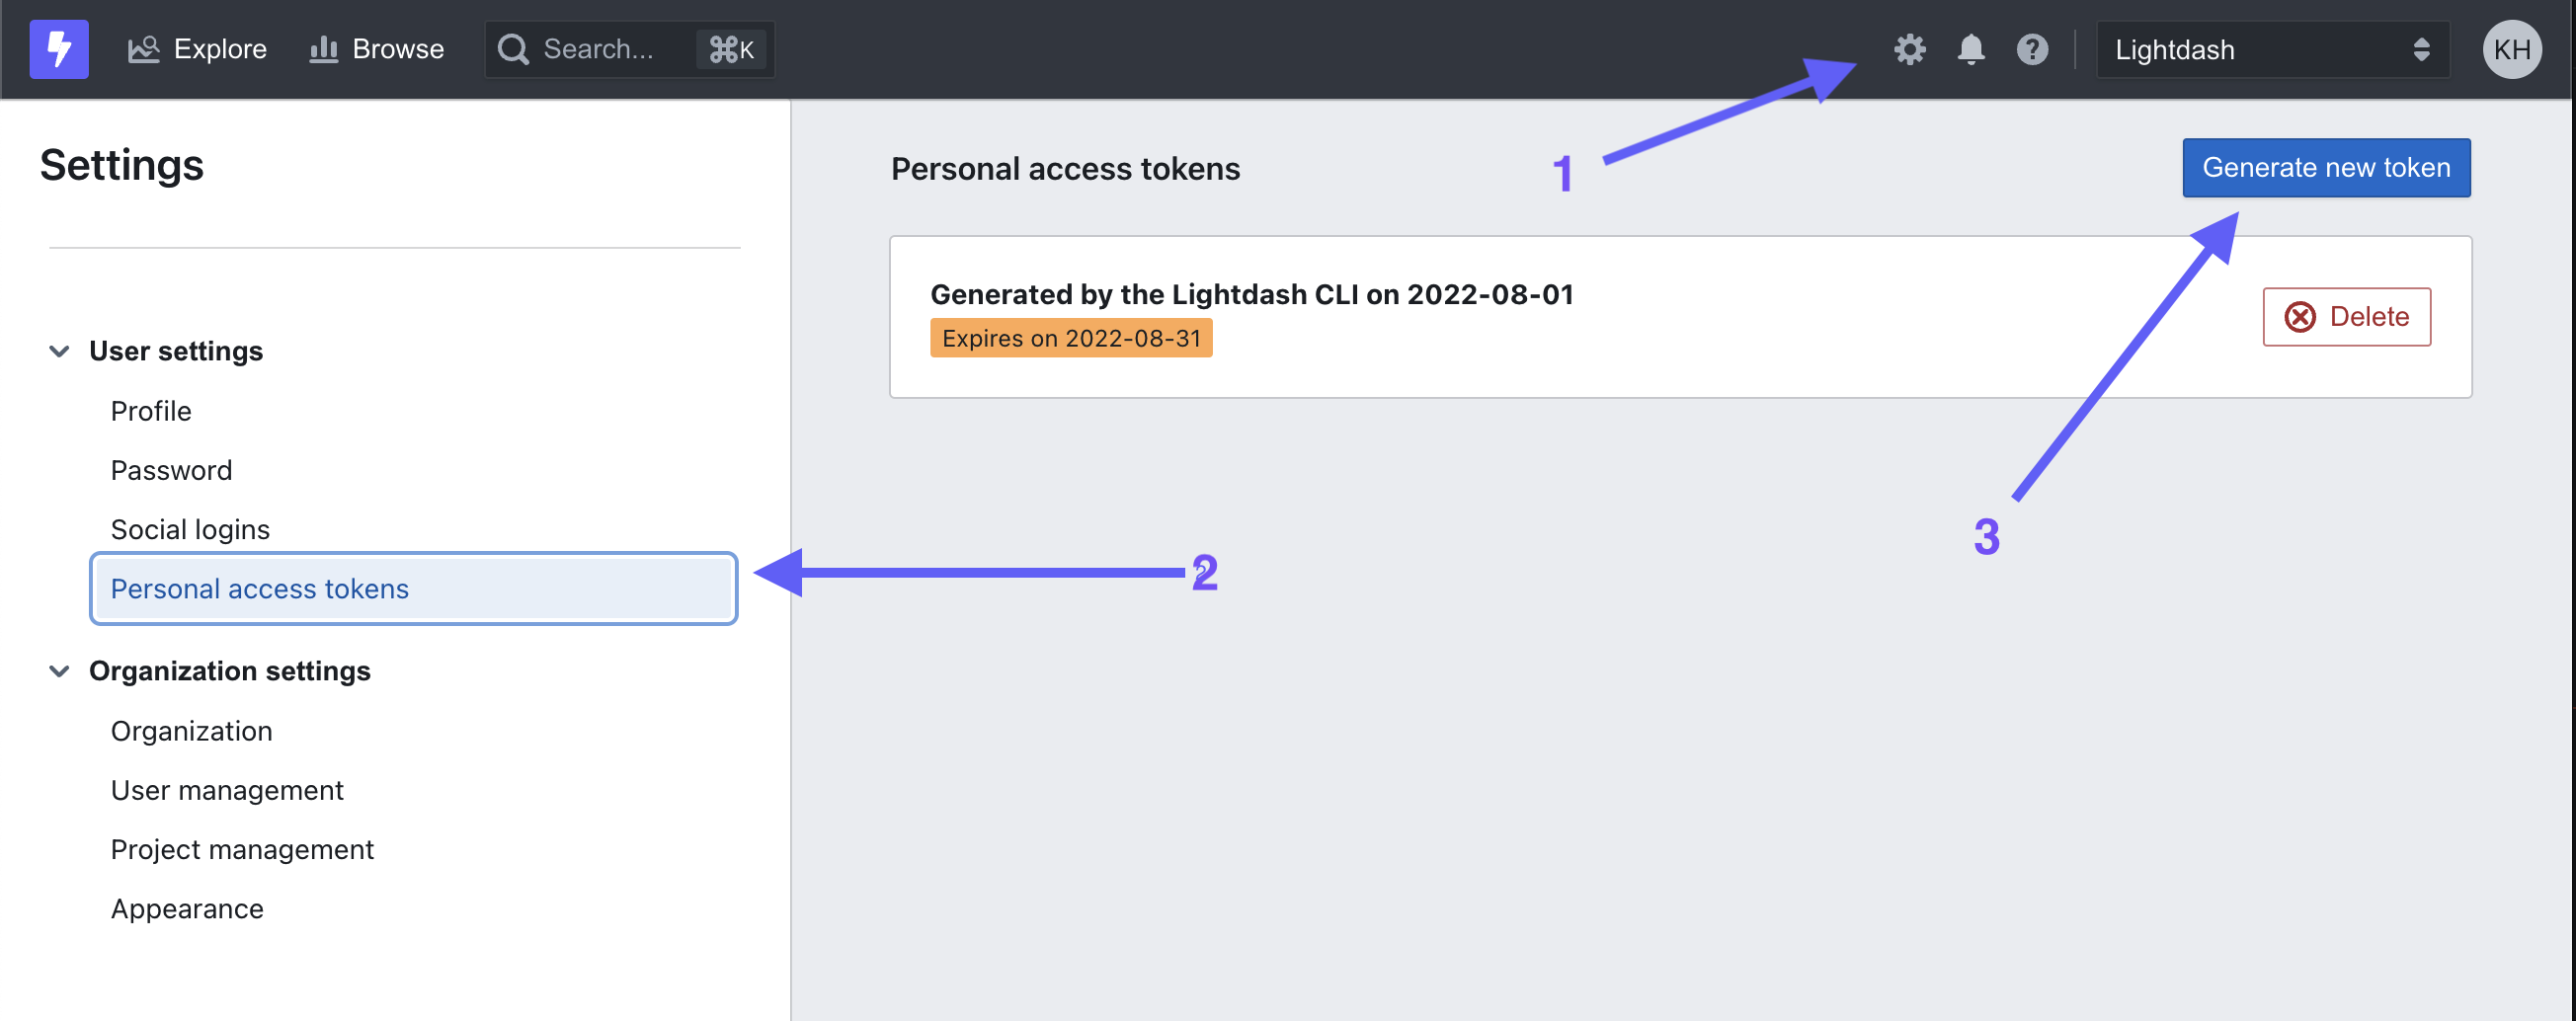
Create a new personal access token, by going to `Settings` > `Personal Access Tokens`. This is the token you'll put in for `LIGHTDASH_API_KEY`.
We need to add the following secrets:
##### `LIGHTDASH_API_KEY`
Create a new personal access token, by going to `Settings` > `Personal Access Tokens`. This is the token you'll put in for `LIGHTDASH_API_KEY`.
 ##### `LIGHTDASH_PROJECT`
The UUID for your project. For example, if your URL looks like [`https://eu1.lightdash.cloud/projects/3538ab33-dc90-aabb-bc00-e50bba3a5f69/tables`](https://eu1.lightdash.cloud/projects/3538ab33-dc90-aabb-bc00-e50bba3a5f69/tables), then `3538ab33-dc90-45f0-aabb-e50bba3a5f69` is your `LIGHTDASH_PROJECT`
##### `LIGHTDASH_URL`
This is either [`https://eu1.lightdash.cloud`](https://eu1.lightdash.cloud) or [`https://app.lightdash.cloud`](https://app.lightdash.cloud) for Lightdash Cloud users (check the URL to your Lightdash project). If you self-host, this should be your own custom domain.
##### `DBT_PROFILES`
Some tips for this bit:
* You might be able to copy a bunch of the information from your local `profiles.yml` file. You can see what's in there by typing `cat ~/.dbt/profiles.yml` in your terminal.
* If you have a separate `prod` and `dev` profile, you probably want to use the information from your `prod` profile for your GitHub action.
* If you want to have different connection settings depending on the user that opened the pull request (dev profiles), then [check out this guide](/guides/cli/how-to-use-lightdash-preview#how-to-use-the-developer-credentials-in-your-preview-project).
Find your data warehouse from the list below to get a profiles.yml file template. Fill out this template, and this is your `DBT_PROFILES` secret.
BigQuery OAuth:
Step 1: create a secret called `GOOGLE_APPLICATION_CREDENTIALS`
Add the service account credentials (the JSON file) that you want to use for your GitHub action. It should look something like this:
```json
{
"type": "service_account",
"project_id": "jaffle_shop",
"private_key_id": "12345",
"private_key": "-----BEGIN PRIVATE KEY----- ... -----END PRIVATE KEY-----\n",
"client_email": "jaffle_shop@jaffle_shop.iam.gserviceaccount.com",
"client_id": "12345",
"auth_uri": "https://accounts.google.com/o/oauth2/auth",
"token_uri": "https://oauth2.googleapis.com/token",
"auth_provider_x509_cert_url": "https://www.googleapis.com/oauth2/v1/certs",
"client_x509_cert_url": "https://www.googleapis.com/robot/v1/metadata/x509/jaffle_shop"
}
```
Step 2: create another secret called `DBT_PROFILES`
Copy-paste this template into the secret and fill out the details.
This will always use this project connection in your GitHub actions. If you want your preview projects to have different connection settings depending on the user that opened the pull request (dev profiles), then see what you need to add to your secret [in this guide](/guides/cli/how-to-use-lightdash-preview#how-to-use-the-developer-credentials-in-your-preview-project).
```yaml
[my-bigquery-db]: # this is the name of your project
target: dev
outputs:
dev:
type: bigquery
method: oauth
keyfile: keyfile.json # no need to change this! We'll automatically use the keyfile you created in the last step.
project: [GCP project id]
dataset: [the name of your dbt dataset]
```
More info in dbt's profiles docs: [https://docs.getdbt.com/reference/warehouse-profiles/bigquery-profile#service-account-file](https://docs.getdbt.com/reference/warehouse-profiles/bigquery-profile#service-account-file)
Postgres profile configuration:
```yaml
company-name:
target: dev
outputs:
dev:
type: postgres
host: [hostname]
user: [username]
password: [password]
port: [port]
dbname: [database name]
schema: [dbt schema]
threads: [1 or more]
keepalives_idle: 0
connect_timeout: 10
retries: 1
```
More info in dbt's profiles docs: [https://docs.getdbt.com/reference/warehouse-profiles/postgres-profile#profile-configuration](https://docs.getdbt.com/reference/warehouse-profiles/postgres-profile#profile-configuration)
This will always use this project connection in your GitHub actions. If you want your preview projects to have different connection settings depending on the user that opened the pull request (dev profiles), then see what you need to add to your secret [in this guide](/guides/cli/how-to-use-lightdash-preview#how-to-use-the-developer-credentials-in-your-preview-project).
Redshift password-based authentication:
```yaml
company-name:
target: dev
outputs:
dev:
type: redshift
host: [hostname.region.redshift.amazonaws.com]
user: [username]
password: [password]
port: 5439
dbname: analytics
schema: analytics
threads: 4
keepalives_idle: 240
connect_timeout: 10
ra3_node: true # enables cross-database sources
```
More info in dbt's profiles docs: [https://docs.getdbt.com/reference/warehouse-profiles/redshift-profile#password-based-authentication](https://docs.getdbt.com/reference/warehouse-profiles/redshift-profile#password-based-authentication)
This will always use this project connection in your GitHub actions. If you want your preview projects to have different connection settings depending on the user that opened the pull request (dev profiles), then see what you need to add to your secret [in this guide](/guides/cli/how-to-use-lightdash-preview#how-to-use-the-developer-credentials-in-your-preview-project).
User / Password authentication:
```yaml
my-snowflake-db:
target: dev
outputs:
dev:
type: snowflake
account: [account id]
# User/password auth
user: [username]
password: [password]
role: [user role]
database: [database name]
warehouse: [warehouse name]
schema: [dbt schema]
threads: [1 or more]
client_session_keep_alive: False
query_tag: [anything]
```
More info in dbt's profiles docs: [https://docs.getdbt.com/reference/warehouse-profiles/snowflake-profile#user--password-authentication](https://docs.getdbt.com/reference/warehouse-profiles/snowflake-profile#user--password-authentication)
This will always use this project connection in your GitHub actions. If you want your preview projects to have different connection settings depending on the user that opened the pull request (dev profiles), then see what you need to add to your secret [in this guide](/guides/cli/how-to-use-lightdash-preview#how-to-use-the-developer-credentials-in-your-preview-project).
Set up a DataBricks target:
```yaml
your_profile_name:
target: dev
outputs:
dev:
type: databricks
catalog:
[
optional catalog name,
if you are using Unity Catalog,
only available in dbt-databricks>=1.1.1,
]
schema: [schema name]
host: [yourorg.databrickshost.com]
http_path: [/sql/your/http/path]
token: [dapiXXXXXXXXXXXXXXXXXXXXXXX] # Personal Access Token (PAT)
threads: [1 or more]
```
More info in dbt's profiles docs: [https://docs.getdbt.com/reference/warehouse-profiles/bigquery-profile#service-account-json](https://docs.getdbt.com/reference/warehouse-profiles/bigquery-profile#service-account-json)
This will always use this project connection in your GitHub actions. If you want your preview projects to have different connection settings depending on the user that opened the pull request (dev profiles), then see what you need to add to your secret [in this guide](/guides/cli/how-to-use-lightdash-preview#how-to-use-the-developer-credentials-in-your-preview-project).
### Step 2: Create start-preview\.yml and close-preview\.yml workflows in Github
Go to your repo, click on `Actions` menu, and click on `Configure`
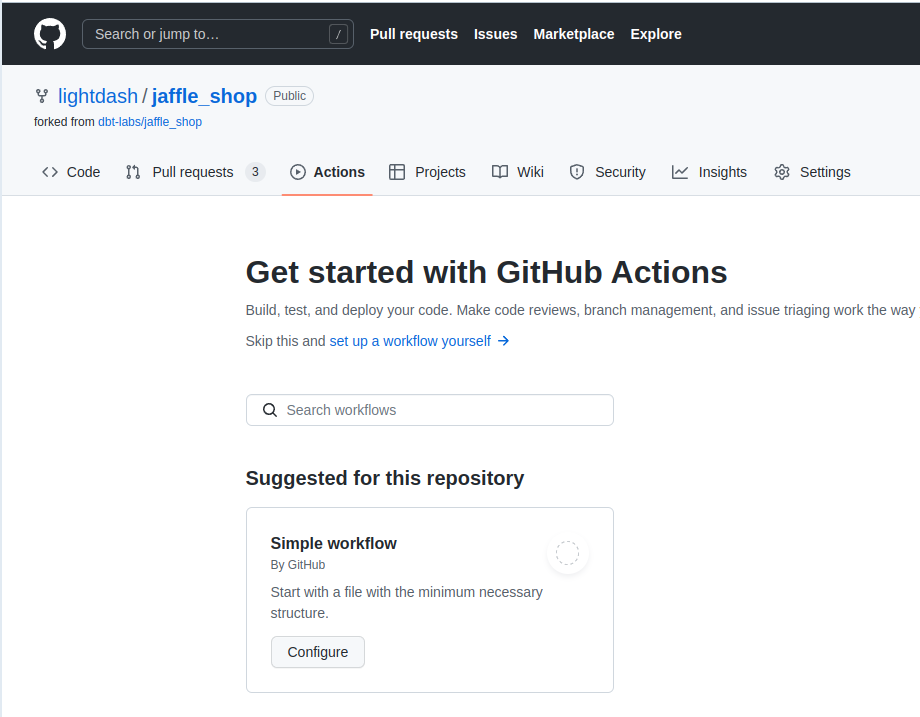
Now copy [this start-preview.yml file](https://github.com/lightdash/cli-actions/blob/main/start-preview.yml) from our [cli-actions](https://github.com/lightdash/cli-actions) repo
And save by clicking on `Start commit`
Do the same with [this close-preview.yml file](https://github.com/lightdash/cli-actions/blob/main/close-preview.yml).
### You're done!
Everytime you create a new `pull request` , a new `preview` project with your `branch` name will be created on your organization. Everytime you make a change to that branch, the preview environment will get updated. Once you close or merge your `pull request`, the `preview` project will get deleted.
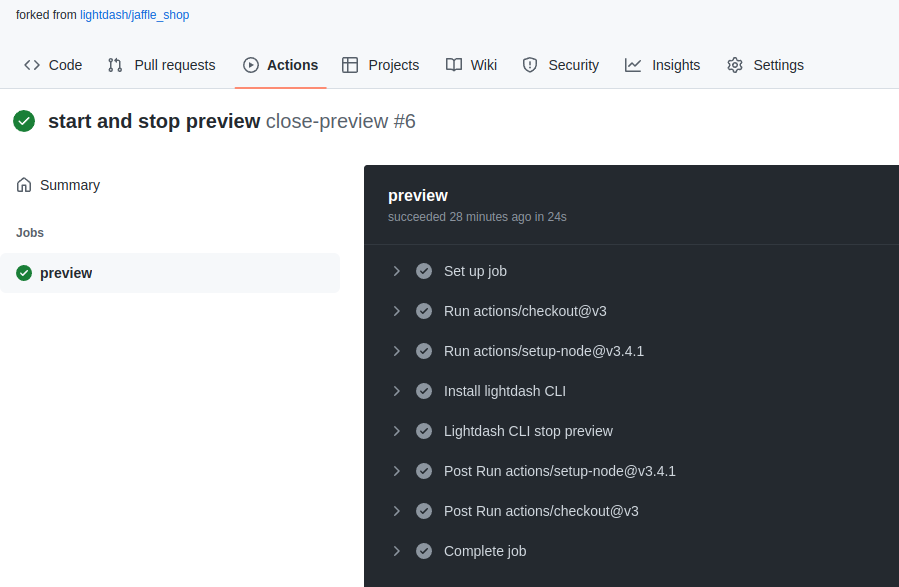
You can see the log on `Github actions` page
## How to use the developer credentials in your preview project
When developing in dbt, you typically have a different set of credentials and dataset/schema than when you are running in production. Here are two options on how to set them up based on the developer that opened the Pull Request.
If you use dbt cloud IDE to create commits and pull requests you need a few extra steps. We need to add a step in the GitHub action to fetch the user that created the pull request.
```yaml
- uses: actions/github-script@v6
id: get_pr_creator
with:
script: |
return (
await github.rest.repos.listPullRequestsAssociatedWithCommit({
commit_sha: context.sha,
owner: context.repo.owner,
repo: context.repo.repo,
})
).data[0].user.login;
result-encoding: string
```
When copying the following templates, you should replace `${{ github.actor }}` with `${{steps.get_pr_creator.outputs.result}}`.
### Using profile targets
Update your `DBT_PROFILES` to have 1 target per developer. The target name should be their GitHub username.
```yaml
jaffle_shop:
target: prod
outputs:
prod:
type: bigquery
method: oauth
keyfile: keyfile.json
project: jaffle-shop
dataset: prod
katie: # example developer 1, should be GitHub username
type: bigquery
method: oauth
keyfile: keyfile.json
project: jaffle-shop
dataset: dbt_katie
jose: # example developer 2
type: bigquery
method: oauth
keyfile: keyfile.json
project: jaffle-shop
dataset: dbt_jose
```
Then, update your GitHub action to use the username as the `--target` flag for the `lightdash start-preview` command.
```yaml
run: lightdash start-preview --project-dir "$PROJECT_DIR" --profiles-dir . --name ${GITHUB_REF##*/} --target ${{ github.actor }}
```
### Using github environments
Setup a [GitHub environment](https://docs.github.com/en/actions/deployment/targeting-different-environments/using-environments-for-deployment) for each developer where the secrets are specifically for them. The environment name should be their GitHub username. Then, update your GitHub action to use the username as the environment.
```yaml
jobs:
preview:
runs-on: ubuntu-latest
environment: ${{ github.actor }}
```
## How to use the dbt cloud schema in your preview project
If you are using a [continuous integration job in dbt cloud](https://docs.getdbt.com/docs/deploy/ci-jobs), you can use the schema that is created by dbt cloud (`dbt_cloud_pr__`) for your preview project.
First we need to add an environment variable to your profile.yml file that will be used by dbt to connect to the correct schema.
```yaml
schema: "{{ env_var('DBT_SCHEMA') }}"
```
If you are using BigQuery, it should be `dataset` instead of `schema`.
Then we need to add a step in the GitHub action to fetch the pull request id.
```yaml
- uses: actions/github-script@v6
id: pr_id
with:
script: |
if (context.issue.number) {
// Return issue number if present
return context.issue.number;
} else {
// Otherwise return issue number from commit
return (
await github.rest.repos.listPullRequestsAssociatedWithCommit({
commit_sha: context.sha,
owner: context.repo.owner,
repo: context.repo.repo,
})
).data[0].number;
}
result-encoding: string
```
After that we need to add a new env variable to the step "Lightdash CLI start preview" which is the schema that dbt cloud will use.
Note that in this example we assume the job id is `1234`. You will need to replace this with the actual job id.
```yaml
env:
# ... keep existing env variables
DBT_SCHEMA: 'dbt_cloud_pr_1234_${{steps.pr_id.outputs.result}}'
```
Now dbt will use the correct schema when running in the preview environment.
##### `LIGHTDASH_PROJECT`
The UUID for your project. For example, if your URL looks like [`https://eu1.lightdash.cloud/projects/3538ab33-dc90-aabb-bc00-e50bba3a5f69/tables`](https://eu1.lightdash.cloud/projects/3538ab33-dc90-aabb-bc00-e50bba3a5f69/tables), then `3538ab33-dc90-45f0-aabb-e50bba3a5f69` is your `LIGHTDASH_PROJECT`
##### `LIGHTDASH_URL`
This is either [`https://eu1.lightdash.cloud`](https://eu1.lightdash.cloud) or [`https://app.lightdash.cloud`](https://app.lightdash.cloud) for Lightdash Cloud users (check the URL to your Lightdash project). If you self-host, this should be your own custom domain.
##### `DBT_PROFILES`
Some tips for this bit:
* You might be able to copy a bunch of the information from your local `profiles.yml` file. You can see what's in there by typing `cat ~/.dbt/profiles.yml` in your terminal.
* If you have a separate `prod` and `dev` profile, you probably want to use the information from your `prod` profile for your GitHub action.
* If you want to have different connection settings depending on the user that opened the pull request (dev profiles), then [check out this guide](/guides/cli/how-to-use-lightdash-preview#how-to-use-the-developer-credentials-in-your-preview-project).
Find your data warehouse from the list below to get a profiles.yml file template. Fill out this template, and this is your `DBT_PROFILES` secret.
BigQuery OAuth:
Step 1: create a secret called `GOOGLE_APPLICATION_CREDENTIALS`
Add the service account credentials (the JSON file) that you want to use for your GitHub action. It should look something like this:
```json
{
"type": "service_account",
"project_id": "jaffle_shop",
"private_key_id": "12345",
"private_key": "-----BEGIN PRIVATE KEY----- ... -----END PRIVATE KEY-----\n",
"client_email": "jaffle_shop@jaffle_shop.iam.gserviceaccount.com",
"client_id": "12345",
"auth_uri": "https://accounts.google.com/o/oauth2/auth",
"token_uri": "https://oauth2.googleapis.com/token",
"auth_provider_x509_cert_url": "https://www.googleapis.com/oauth2/v1/certs",
"client_x509_cert_url": "https://www.googleapis.com/robot/v1/metadata/x509/jaffle_shop"
}
```
Step 2: create another secret called `DBT_PROFILES`
Copy-paste this template into the secret and fill out the details.
This will always use this project connection in your GitHub actions. If you want your preview projects to have different connection settings depending on the user that opened the pull request (dev profiles), then see what you need to add to your secret [in this guide](/guides/cli/how-to-use-lightdash-preview#how-to-use-the-developer-credentials-in-your-preview-project).
```yaml
[my-bigquery-db]: # this is the name of your project
target: dev
outputs:
dev:
type: bigquery
method: oauth
keyfile: keyfile.json # no need to change this! We'll automatically use the keyfile you created in the last step.
project: [GCP project id]
dataset: [the name of your dbt dataset]
```
More info in dbt's profiles docs: [https://docs.getdbt.com/reference/warehouse-profiles/bigquery-profile#service-account-file](https://docs.getdbt.com/reference/warehouse-profiles/bigquery-profile#service-account-file)
Postgres profile configuration:
```yaml
company-name:
target: dev
outputs:
dev:
type: postgres
host: [hostname]
user: [username]
password: [password]
port: [port]
dbname: [database name]
schema: [dbt schema]
threads: [1 or more]
keepalives_idle: 0
connect_timeout: 10
retries: 1
```
More info in dbt's profiles docs: [https://docs.getdbt.com/reference/warehouse-profiles/postgres-profile#profile-configuration](https://docs.getdbt.com/reference/warehouse-profiles/postgres-profile#profile-configuration)
This will always use this project connection in your GitHub actions. If you want your preview projects to have different connection settings depending on the user that opened the pull request (dev profiles), then see what you need to add to your secret [in this guide](/guides/cli/how-to-use-lightdash-preview#how-to-use-the-developer-credentials-in-your-preview-project).
Redshift password-based authentication:
```yaml
company-name:
target: dev
outputs:
dev:
type: redshift
host: [hostname.region.redshift.amazonaws.com]
user: [username]
password: [password]
port: 5439
dbname: analytics
schema: analytics
threads: 4
keepalives_idle: 240
connect_timeout: 10
ra3_node: true # enables cross-database sources
```
More info in dbt's profiles docs: [https://docs.getdbt.com/reference/warehouse-profiles/redshift-profile#password-based-authentication](https://docs.getdbt.com/reference/warehouse-profiles/redshift-profile#password-based-authentication)
This will always use this project connection in your GitHub actions. If you want your preview projects to have different connection settings depending on the user that opened the pull request (dev profiles), then see what you need to add to your secret [in this guide](/guides/cli/how-to-use-lightdash-preview#how-to-use-the-developer-credentials-in-your-preview-project).
User / Password authentication:
```yaml
my-snowflake-db:
target: dev
outputs:
dev:
type: snowflake
account: [account id]
# User/password auth
user: [username]
password: [password]
role: [user role]
database: [database name]
warehouse: [warehouse name]
schema: [dbt schema]
threads: [1 or more]
client_session_keep_alive: False
query_tag: [anything]
```
More info in dbt's profiles docs: [https://docs.getdbt.com/reference/warehouse-profiles/snowflake-profile#user--password-authentication](https://docs.getdbt.com/reference/warehouse-profiles/snowflake-profile#user--password-authentication)
This will always use this project connection in your GitHub actions. If you want your preview projects to have different connection settings depending on the user that opened the pull request (dev profiles), then see what you need to add to your secret [in this guide](/guides/cli/how-to-use-lightdash-preview#how-to-use-the-developer-credentials-in-your-preview-project).
Set up a DataBricks target:
```yaml
your_profile_name:
target: dev
outputs:
dev:
type: databricks
catalog:
[
optional catalog name,
if you are using Unity Catalog,
only available in dbt-databricks>=1.1.1,
]
schema: [schema name]
host: [yourorg.databrickshost.com]
http_path: [/sql/your/http/path]
token: [dapiXXXXXXXXXXXXXXXXXXXXXXX] # Personal Access Token (PAT)
threads: [1 or more]
```
More info in dbt's profiles docs: [https://docs.getdbt.com/reference/warehouse-profiles/bigquery-profile#service-account-json](https://docs.getdbt.com/reference/warehouse-profiles/bigquery-profile#service-account-json)
This will always use this project connection in your GitHub actions. If you want your preview projects to have different connection settings depending on the user that opened the pull request (dev profiles), then see what you need to add to your secret [in this guide](/guides/cli/how-to-use-lightdash-preview#how-to-use-the-developer-credentials-in-your-preview-project).
### Step 2: Create start-preview\.yml and close-preview\.yml workflows in Github
Go to your repo, click on `Actions` menu, and click on `Configure`

Now copy [this start-preview.yml file](https://github.com/lightdash/cli-actions/blob/main/start-preview.yml) from our [cli-actions](https://github.com/lightdash/cli-actions) repo
And save by clicking on `Start commit`
Do the same with [this close-preview.yml file](https://github.com/lightdash/cli-actions/blob/main/close-preview.yml).
### You're done!
Everytime you create a new `pull request` , a new `preview` project with your `branch` name will be created on your organization. Everytime you make a change to that branch, the preview environment will get updated. Once you close or merge your `pull request`, the `preview` project will get deleted.
You can see the log on `Github actions` page

## How to use the developer credentials in your preview project
When developing in dbt, you typically have a different set of credentials and dataset/schema than when you are running in production. Here are two options on how to set them up based on the developer that opened the Pull Request.
If you use dbt cloud IDE to create commits and pull requests you need a few extra steps. We need to add a step in the GitHub action to fetch the user that created the pull request.
```yaml
- uses: actions/github-script@v6
id: get_pr_creator
with:
script: |
return (
await github.rest.repos.listPullRequestsAssociatedWithCommit({
commit_sha: context.sha,
owner: context.repo.owner,
repo: context.repo.repo,
})
).data[0].user.login;
result-encoding: string
```
When copying the following templates, you should replace `${{ github.actor }}` with `${{steps.get_pr_creator.outputs.result}}`.
### Using profile targets
Update your `DBT_PROFILES` to have 1 target per developer. The target name should be their GitHub username.
```yaml
jaffle_shop:
target: prod
outputs:
prod:
type: bigquery
method: oauth
keyfile: keyfile.json
project: jaffle-shop
dataset: prod
katie: # example developer 1, should be GitHub username
type: bigquery
method: oauth
keyfile: keyfile.json
project: jaffle-shop
dataset: dbt_katie
jose: # example developer 2
type: bigquery
method: oauth
keyfile: keyfile.json
project: jaffle-shop
dataset: dbt_jose
```
Then, update your GitHub action to use the username as the `--target` flag for the `lightdash start-preview` command.
```yaml
run: lightdash start-preview --project-dir "$PROJECT_DIR" --profiles-dir . --name ${GITHUB_REF##*/} --target ${{ github.actor }}
```
### Using github environments
Setup a [GitHub environment](https://docs.github.com/en/actions/deployment/targeting-different-environments/using-environments-for-deployment) for each developer where the secrets are specifically for them. The environment name should be their GitHub username. Then, update your GitHub action to use the username as the environment.
```yaml
jobs:
preview:
runs-on: ubuntu-latest
environment: ${{ github.actor }}
```
## How to use the dbt cloud schema in your preview project
If you are using a [continuous integration job in dbt cloud](https://docs.getdbt.com/docs/deploy/ci-jobs), you can use the schema that is created by dbt cloud (`dbt_cloud_pr__`) for your preview project.
First we need to add an environment variable to your profile.yml file that will be used by dbt to connect to the correct schema.
```yaml
schema: "{{ env_var('DBT_SCHEMA') }}"
```
If you are using BigQuery, it should be `dataset` instead of `schema`.
Then we need to add a step in the GitHub action to fetch the pull request id.
```yaml
- uses: actions/github-script@v6
id: pr_id
with:
script: |
if (context.issue.number) {
// Return issue number if present
return context.issue.number;
} else {
// Otherwise return issue number from commit
return (
await github.rest.repos.listPullRequestsAssociatedWithCommit({
commit_sha: context.sha,
owner: context.repo.owner,
repo: context.repo.repo,
})
).data[0].number;
}
result-encoding: string
```
After that we need to add a new env variable to the step "Lightdash CLI start preview" which is the schema that dbt cloud will use.
Note that in this example we assume the job id is `1234`. You will need to replace this with the actual job id.
```yaml
env:
# ... keep existing env variables
DBT_SCHEMA: 'dbt_cloud_pr_1234_${{steps.pr_id.outputs.result}}'
```
Now dbt will use the correct schema when running in the preview environment.