> ## Documentation Index
> Fetch the complete documentation index at: https://lightdash-docs-many-to-many.mintlify.site/llms.txt
> Use this file to discover all available pages before exploring further.
# SCIM Integration
**SCIM Integration is only available on Lightdash Enterprise plans.**
For more information on our plans, visit our [pricing page](https://www.lightdash.com/pricing).
## Summary
This document describes the steps required to integrate Azure or Okta SCIM protocol into your Enterprise instance. This provides a connection for Azure or Okta to manage users and groups within your organization.
## SCIM Setup within Lightdash
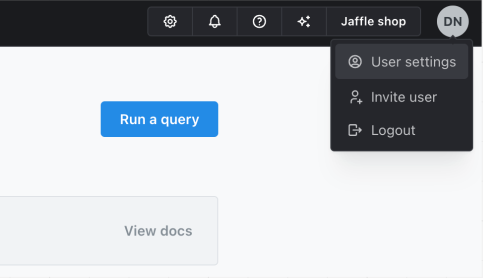
1. Sign into your Lightdash instance, click your initials at the top-right, and select **User Settings**.
2. In the sidebar, select **SCIM Access Tokens**.
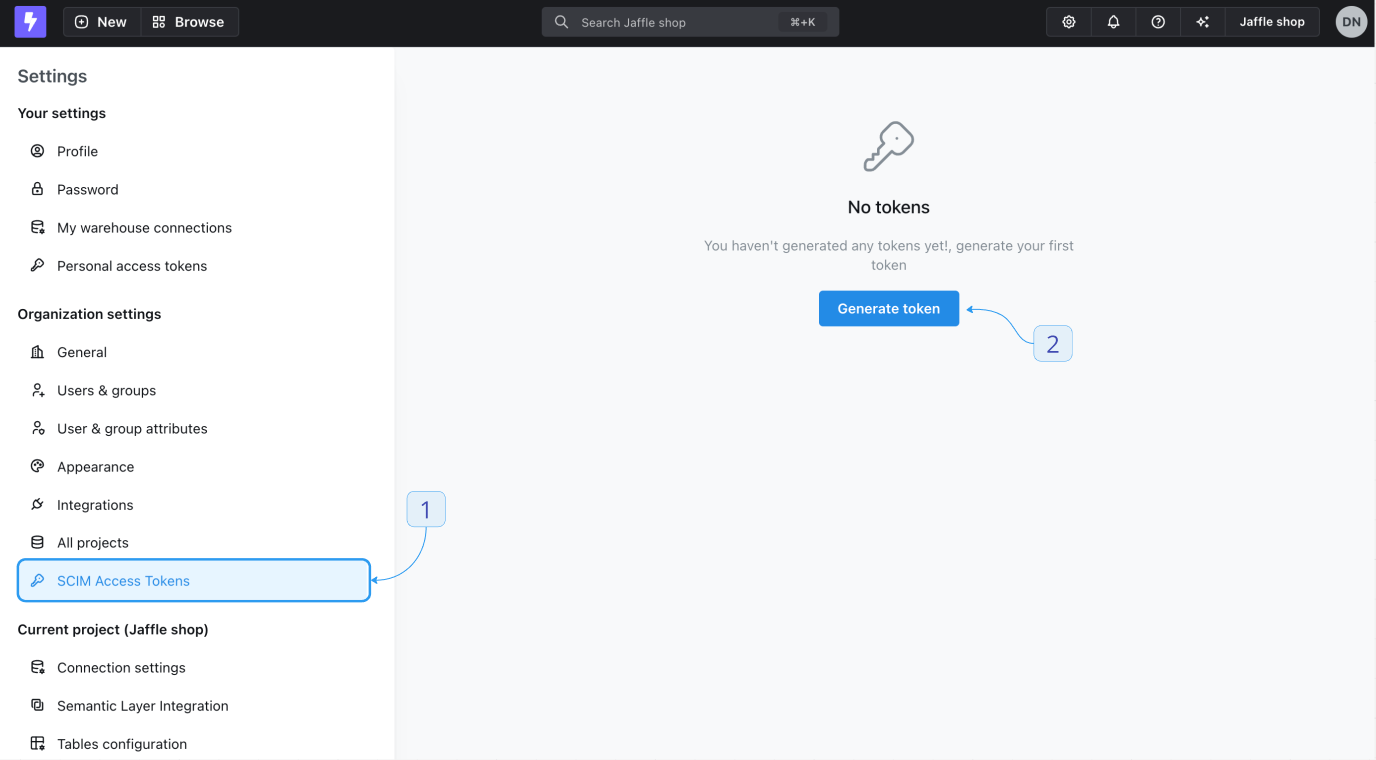
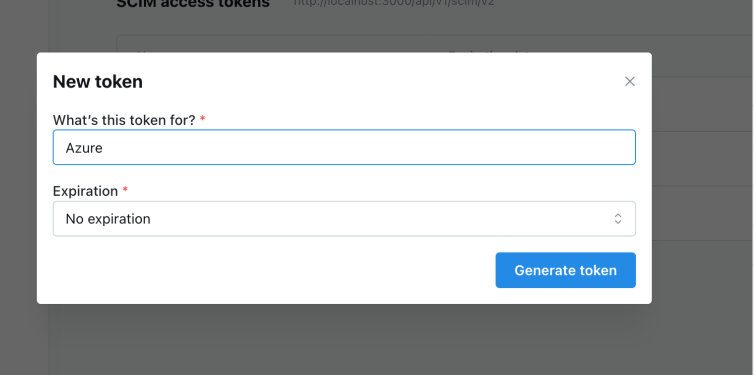
3. Click **Generate new token**.
* Give it a name and an optional expiration date.
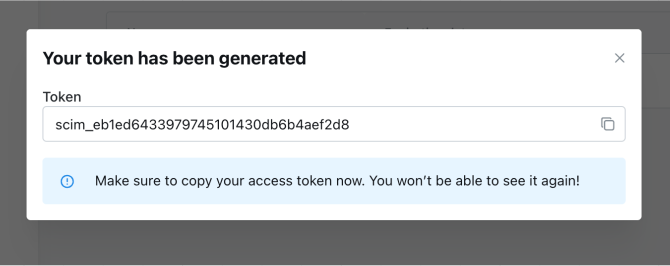
4. Once generated, copy and save it in a safe place, as it cannot be viewed again once the modal is closed.
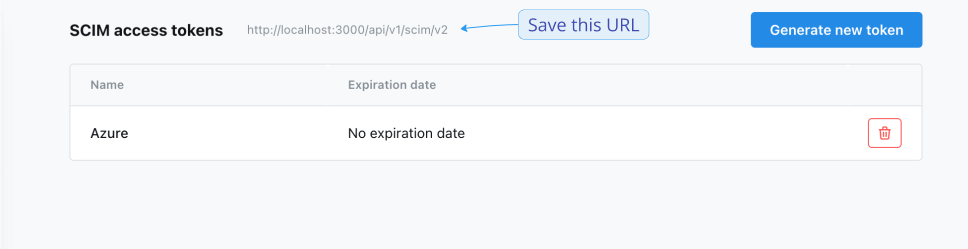
5. Note: Now you will also be able to see your SCIM URL at the top of the page. You will need this when connecting an external SCIM service, such as Okta or Azure.
## Okta Integration
You'll need administrative permissions to configure SCIM for your organization
### Step 1 - Add or Create Application in Okta
You can skip this step if you have Okta SSO already configured. An application will already be present.
1. Visit your Okta account and sign in.
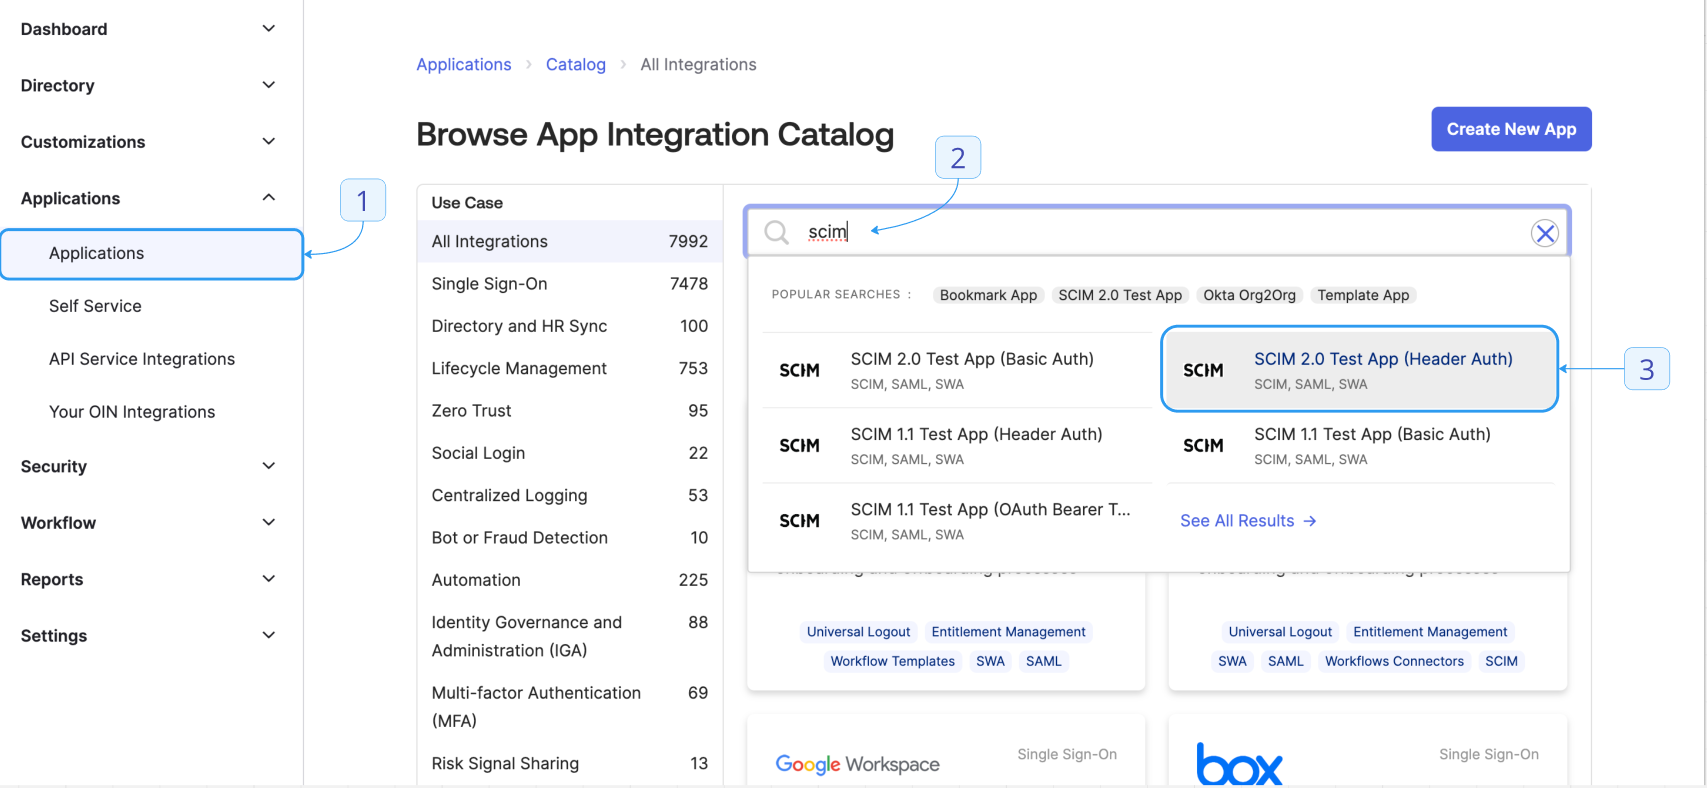
2. In the sidebar, click **Applications > Browse App Catalog**.
3. Search for "SCIM" and select **SCIM 2.0 Test App (Header Auth)**.
4. Click **+ Add Integration**.
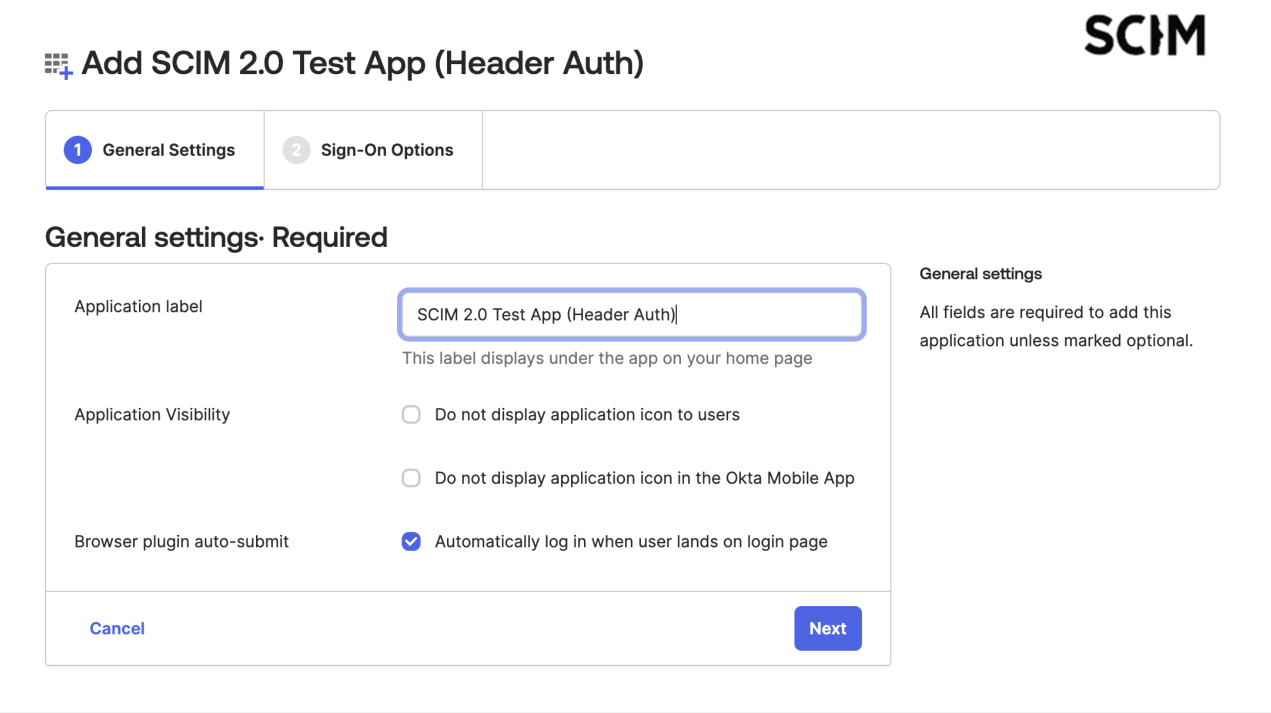
5. Give it a friendly name and click **Next**.
6. Change **Application username format** to email.
7. Save your configuration by clicking **Done**.
### Step 2 - Connect SCIM to Lightdash from Okta
1. In the sidebar, click **Applications > Applications**.
2. Select your application and go to the **Provisioning** tab.
3. Select **Configure API Integration**.
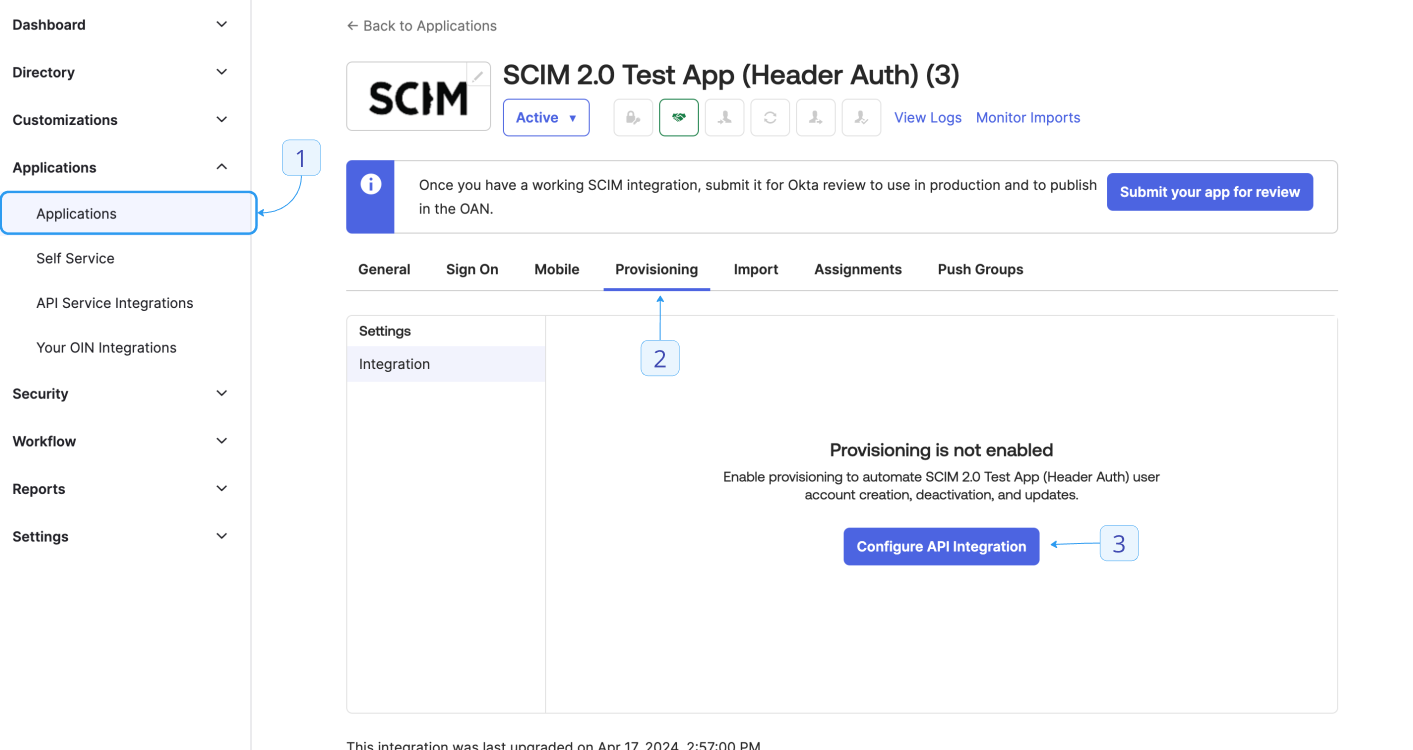
4. Check the **Enable API integration** checkbox.
5. Fill in the following fields:
* **Base URL**: `https://YOUR_APP_URL/api/v1/scim/v2/`
* **API Token**: `Bearer YOUR_SCIM_TOKEN` (See SCIM Setup within Lightdash above for generating a token)
6. Save your configuration.
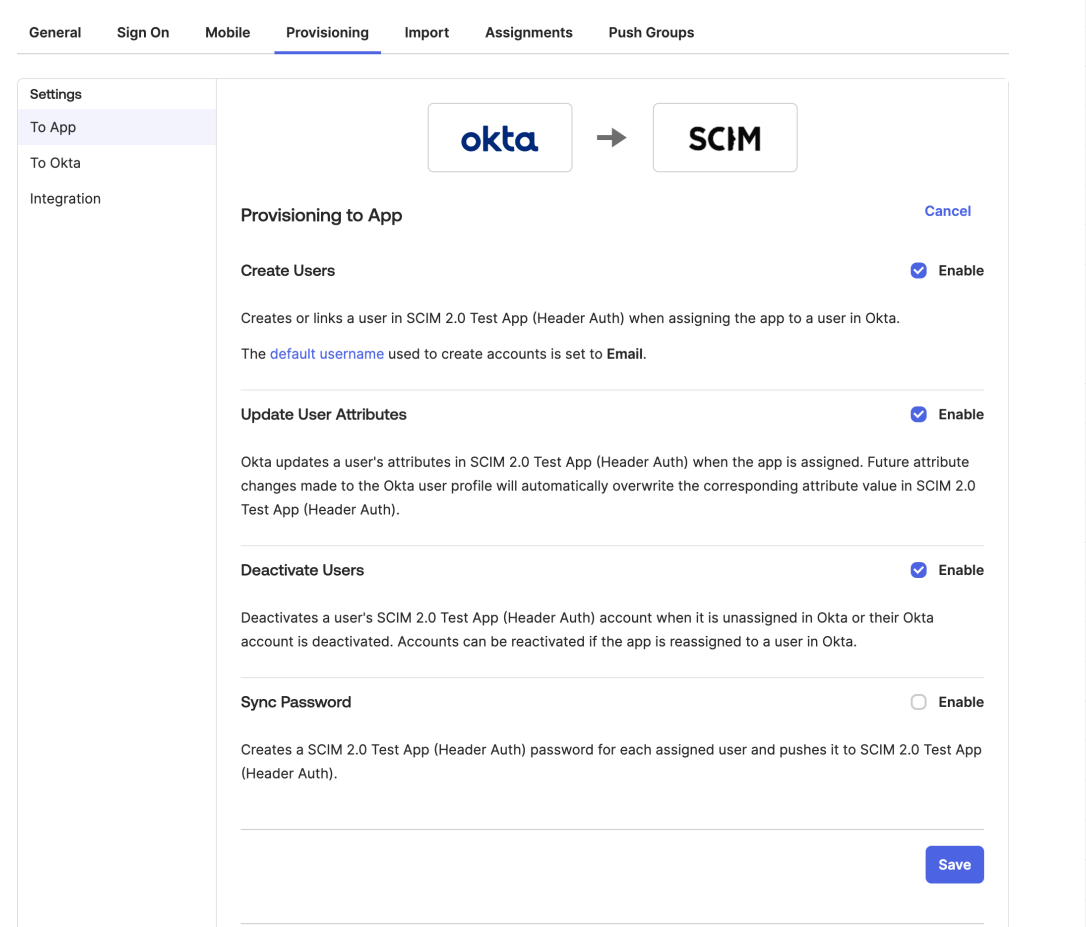
7. More options should be available. In **Provisioning > To App**, select **Edit**.
* Enable **Create Users**.
* Enable **Update User Attributes**.
* Enable **Deactivate Users**.
* Click **Save**.
8. Test the integration by clicking **Assignments**. Select **Assign > Assign to people**. Choose a user and click **Assign > Save and Go Back**. This user should be created in your Lightdash instance.
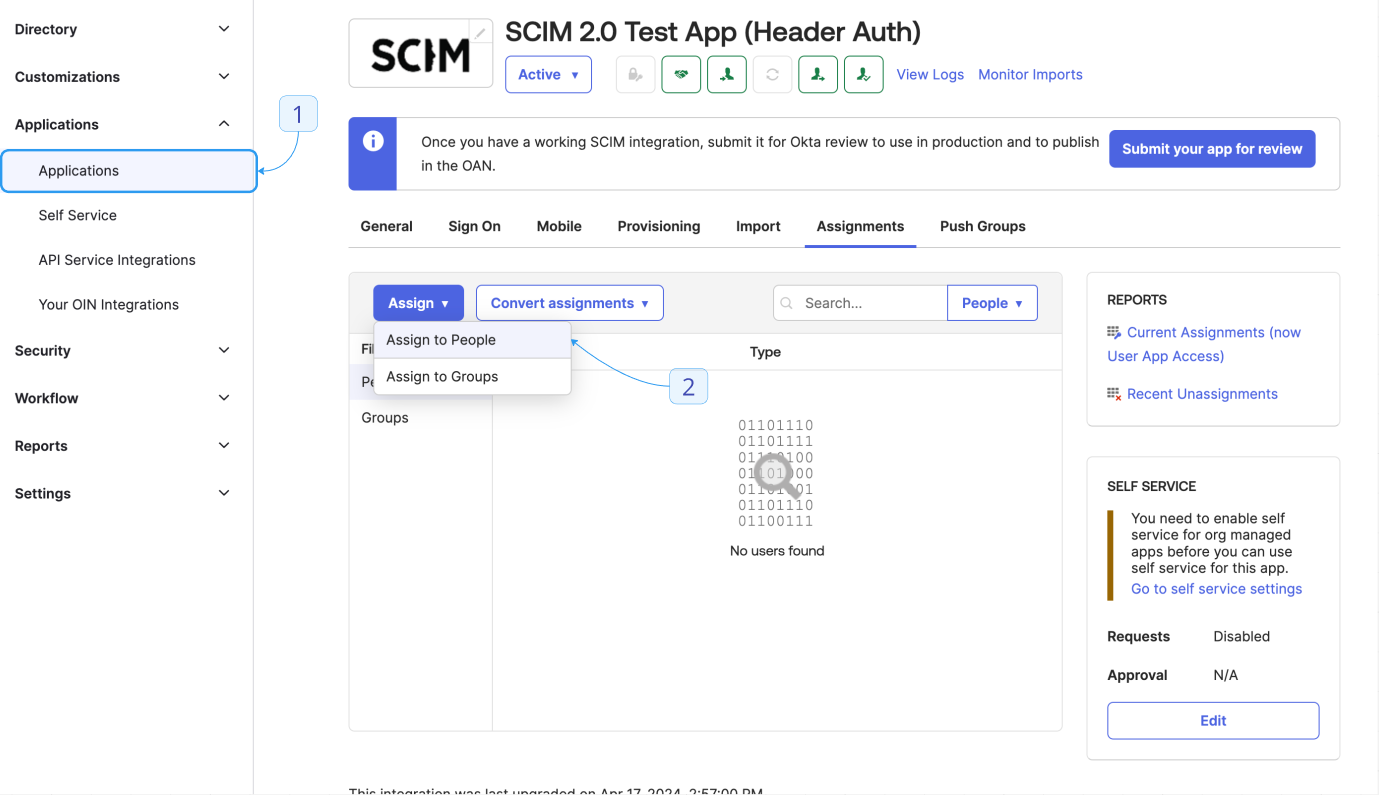
**Lightdash will sync the active status from Okta to Lightdash.**
For example, if a user is provisioned as inactive or is deactivated in Okta, that user will still exist in Lightdash marked as inactive, meaning they will be unable to use the platform.
## Azure Integration
You'll need `Hybrid identity administrator` permissions to configure SCIM for your organization
### Step 1 - Connect SCIM to Lightdash from Azure
1. Visit [Entra ID](https://entra.microsoft.com/) and sign in.
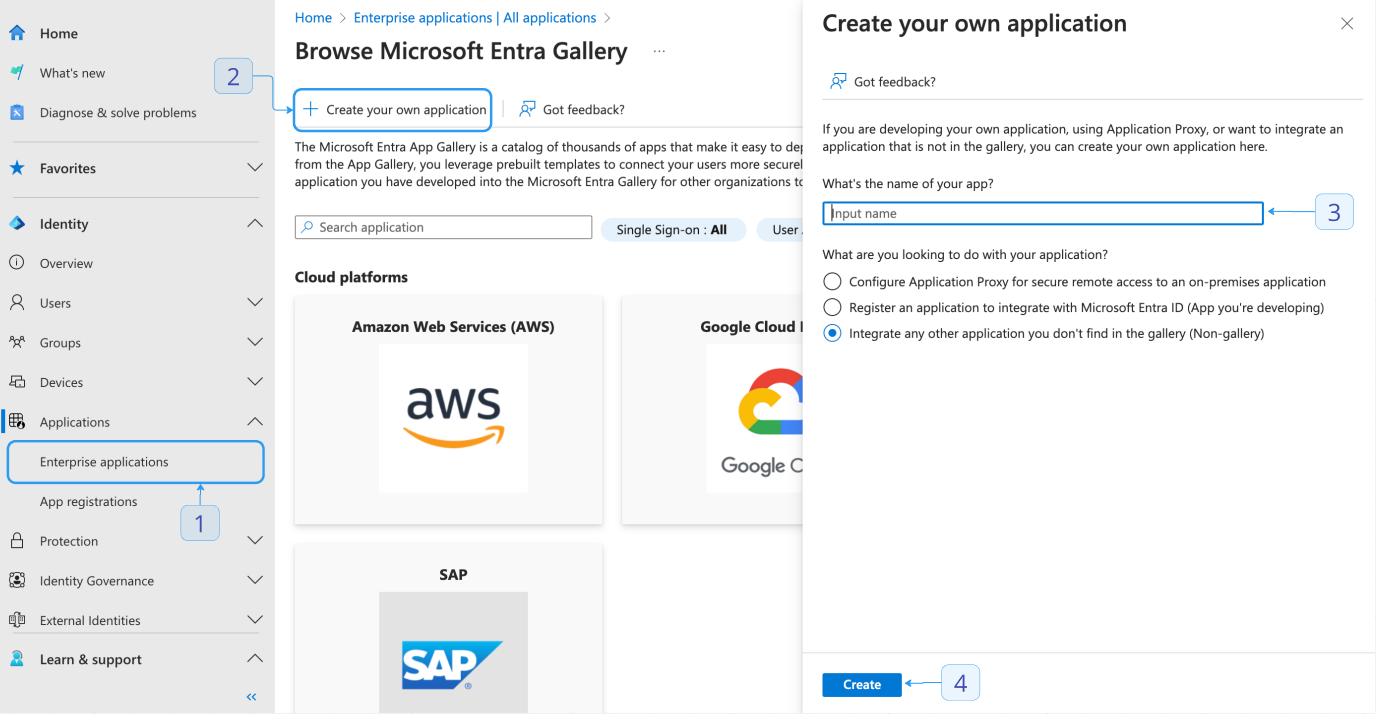
2. In the sidebar, click **Enterprise applications**.
3. Select **+ New Registration**.
4. At the top of the page, select **+ Create Your own application**.
* Add a friendly title.
* Leave the default "Non-gallery" option selected.
5. Save your configuration by clicking **Create**.
### Step 2 - Assign users and groups to the application
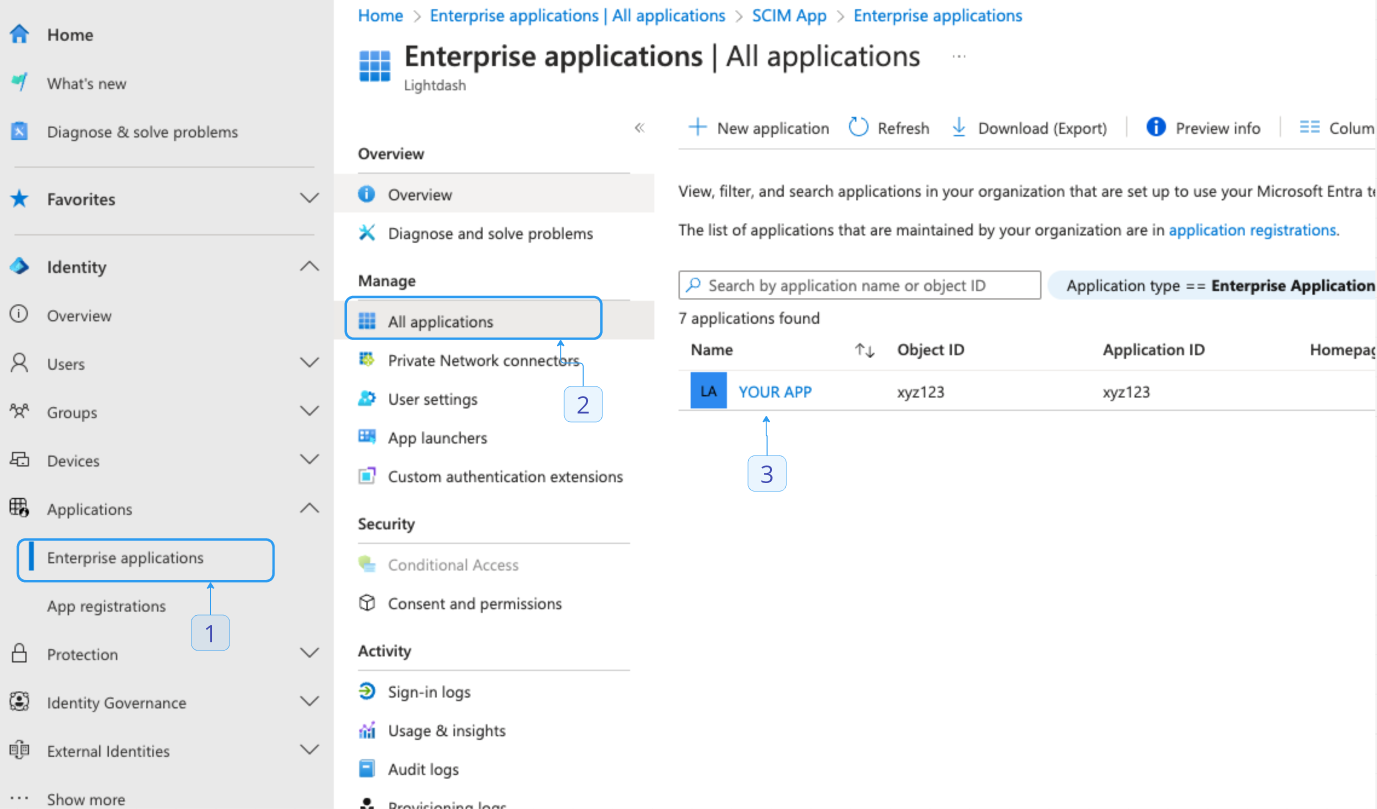
1. Navigate to **Enterprise applications** and select your application.
2. Select **Users and groups > + Add user/group**.
3. Click **None selected**, which will open a modal.
* Select any users and groups you want to provision and then close the modal with **Select**.
4. Click **Assign** to save.
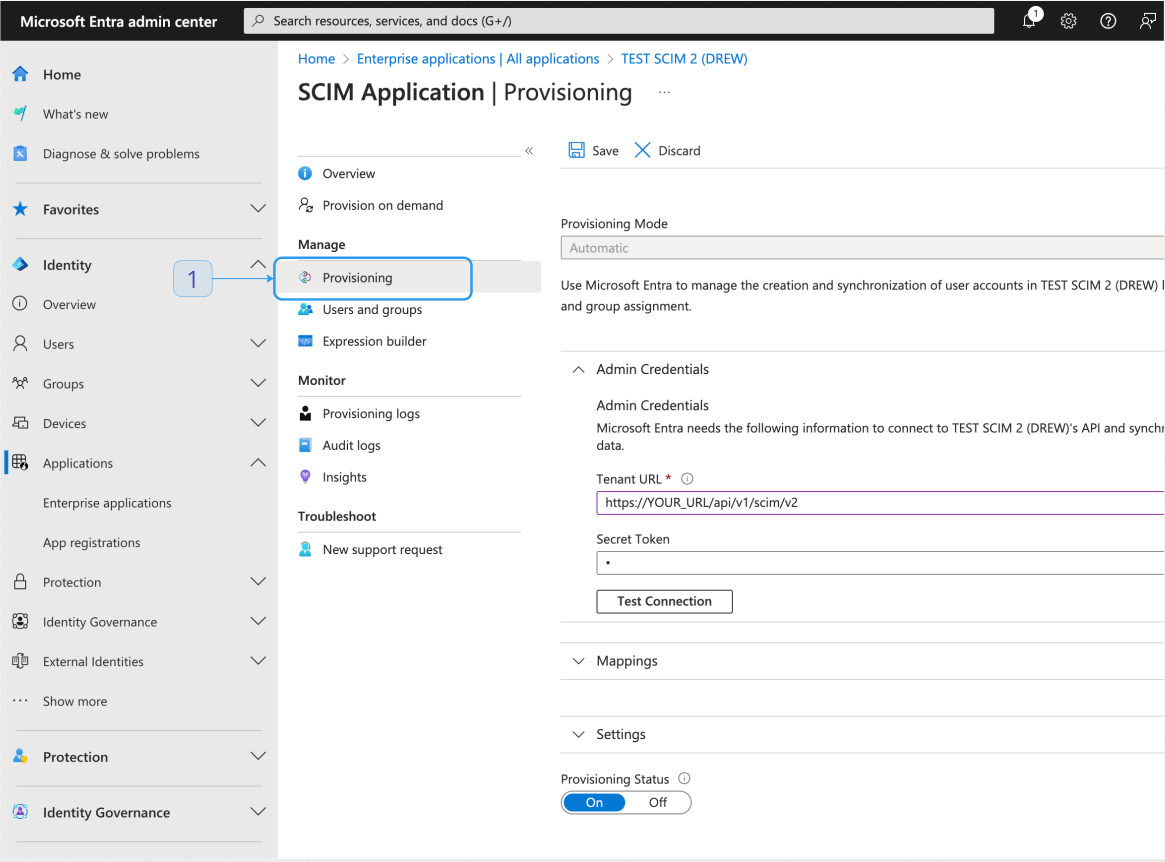
### Step 3 - Configure SCIM provisioning in Azure
1. Navigate to **Enterprise applications** and select your application.
2. Select **Provision > Connect your application**.
3. Set Tenant URL and secret token based on the values in the Lightdash SCIM settings page.
4. Test connection, to confirm values are correct.
5. Click **Create** to save.
### Step 4 - Start provisioning
1. Navigate to **Enterprise applications** and select your application.
2. Select **Provision**.
3. Click **Start provisioning** to save.
4. After a few minutes, your users and groups will be synced.
**Lightdash will sync the active status from Azure to Lightdash.**
For example, if a user is provisioned as inactive or is deactivated in Azure, that user will still exist in Lightdash marked as inactive, meaning they will be unable to use the platform.
## User Role Provisioning
Lightdash supports provisioning user roles through SCIM, allowing identity providers to specify and manage user roles (admin, member, etc.) when provisioning users. This makes it easier to manage user permissions directly from your identity provider without requiring additional steps in Lightdash.
### Lightdash Extension Schema
To set user roles, Lightdash provides an extension schema that can be included in SCIM requests:
```
urn:lightdash:params:scim:schemas:extension:2.0:User
```
The extension schema supports the following properties:
| Property | Description | Required | Default |
| :------- | :---------------------------------- | :------: | :-----------: |
| `role` | The user's role in the organization | No | `member` \[1] |
\[1] If the role property is missing when creating a user, the user will be created with the role `member`.
**Important:** When mapping attributes in Azure or Okta, you must prefix the property with the complete schema name.
For example, to set the `role` property, you must use `urn:lightdash:params:scim:schemas:extension:2.0:User:role` as
the attribute path.
### Valid Roles
The following roles are supported:
* `member`
* `viewer`
* `interactive_viewer`
* `editor`
* `developer`
* `admin`
### SCIM API examples
Here are curl commands for user creation and role updates using the SCIM API in Lightdash.
#### Prerequisites
```bash
# Set these variables before running the commands
SCIM_TOKEN="your-scim-token-here"
LIGHTDASH_URL="https://your-lightdash-instance.com" # No trailing slash
USER_ID="existing-user-id" # Only needed for update operations
```
#### Create a New User with Role
```bash
curl -X POST "${LIGHTDASH_URL}/api/v1/scim/v2/Users" \
-H "Authorization: Bearer ${SCIM_TOKEN}" \
-H "Content-Type: application/json" \
-d '{
"schemas": [
"urn:ietf:params:scim:schemas:core:2.0:User",
"urn:lightdash:params:scim:schemas:extension:2.0:User"
],
"userName": "newuser@example.com",
"name": {
"givenName": "New",
"familyName": "User"
},
"active": true,
"emails": [
{
"value": "newuser@example.com",
"primary": true
}
],
"urn:lightdash:params:scim:schemas:extension:2.0:User": {
"role": "admin"
}
}'
```
#### Update User Role with PUT
```bash
curl -X PUT "${LIGHTDASH_URL}/api/v1/scim/v2/Users/${USER_ID}" \
-H "Authorization: Bearer ${SCIM_TOKEN}" \
-H "Content-Type: application/json" \
-d '{
"schemas": [
"urn:ietf:params:scim:schemas:core:2.0:User",
"urn:lightdash:params:scim:schemas:extension:2.0:User"
],
"userName": "existinguser@example.com",
"name": {
"givenName": "Existing",
"familyName": "User"
},
"active": true,
"emails": [
{
"value": "existinguser@example.com",
"primary": true
}
],
"urn:lightdash:params:scim:schemas:extension:2.0:User": {
"role": "editor"
}
}'
```
#### Update User Role with PATCH
```bash
curl -X PATCH "${LIGHTDASH_URL}/api/v1/scim/v2/Users/${USER_ID}" \
-H "Authorization: Bearer ${SCIM_TOKEN}" \
-H "Content-Type: application/json" \
-d '{
"schemas": ["urn:ietf:params:scim:api:messages:2.0:PatchOp"],
"Operations": [
{
"op": "Add",
"path": "urn:lightdash:params:scim:schemas:extension:2.0:User:role",
"value": "viewer"
}
]
}'
```
#### Get User to Verify Role
```bash
curl -X GET "${LIGHTDASH_URL}/api/v1/scim/v2/Users/${USER_ID}" \
-H "Authorization: Bearer ${SCIM_TOKEN}"
```
## Rotating a SCIM access token
To maintain security, you may want to rotate your SCIM access tokens periodically. Follow these steps to rotate an existing token.
Requirements for Rotation
* **Token UUID**: To rotate a token, you’ll need its unique identifier (UUID), which you can find on the tokens page in your organization settings.
* **Expiration Date**: You must specify a new expiration date when rotating a token. Tokens without an expiration cannot be rotated.
* **Time Interval**: Tokens can only be rotated once per hour.
Use the following curl command to rotate a SCIM access token. Replace `` with the UUID of the token you wish to rotate, and `` with your [personal access token](/references/personal_tokens/). This process will invalidate the previous token and return a new token with the specified expiration date.
```json
curl --location --request PATCH 'https://my.lightdash.com/api/v1/scim/organization-access-tokens//rotate' \
--header 'Content-Type: application/json' \
--header 'Authorization: ApiKey ' \
--data '{
"expiresAt": "2025-12-13T16:10:04.976Z"
}'
```
Example response:
```json
{
"status": "ok",
"results": {
"uuid": "bf677698-502e-4ed6-aa90-02a17999c379",
"organizationUuid": "172a2270-000f-42be-9c68-c4752c23ae51",
"description": "rotate token",
"createdAt": "2024-11-18T13:50:21.241Z",
"expiresAt": "2025-12-13T16:10:04.976Z",
"lastUsedAt": "2024-11-18T14:24:41.367Z",
"rotatedAt": "2024-11-18T15:15:24.361Z",
"token": "scim_204b5ccaf4d11e656efbf1f68986028a"
}
}
```
To get a token metadata, use the following curl command:
```json
curl --location 'http://localhost:3000/api/v1/scim/organization-access-tokens/' \
--header 'Authorization: ApiKey '
```
Example response:
```json
{
"status": "ok",
"results": {
"uuid": "bf677698-502e-4ed6-aa90-02a17999c379",
"organizationUuid": "172a2270-000f-42be-9c68-c4752c23ae51",
"description": "Okta SCIM token",
"createdAt": "2024-11-18T13:50:21.241Z",
"expiresAt": "2025-12-13T16:10:04.976Z",
"lastUsedAt": "2024-11-18T14:24:41.367Z",
"rotatedAt": "2024-11-18T14:10:51.460Z"
}
}
```
To list all tokens, use the following curl command:
```json
curl --location 'http://localhost:3000/api/v1/scim/organization-access-tokens' \
--header 'Authorization: ApiKey '
```
Example response:
```json
{
"status": "ok",
"results": [
{
"uuid": "bf677698-502e-4ed6-aa90-02a17999c379",
"organizationUuid": "172a2270-000f-42be-9c68-c4752c23ae51",
"description": "Okta SCIM token",
"createdAt": "2024-11-18T13:50:21.241Z",
"expiresAt": "2025-12-13T16:10:04.976Z",
"lastUsedAt": "2024-11-18T14:24:41.367Z",
"rotatedAt": "2024-11-18T14:10:51.460Z"
}
]
}
```