> ## Documentation Index
> Fetch the complete documentation index at: https://lightdash-docs-many-to-many.mintlify.site/llms.txt
> Use this file to discover all available pages before exploring further.
# Tables reference
> You can run queries against the tables in your Lightdash project.
Tables in Lightdash are built from dbt models (either one, or many joined together).
## Adding Tables to your project
Tables come from dbt models that have been defined in your dbt project's `schema.yml` files.
If your dbt model has been defined in a YAML file, and has at least one column documented, it will appear in Lightdash as a table.
For example, if we had this in our `schema.yml` files in dbt, we'd see a Table called **Users** in Lightdash.
```yaml
models:
- name: users
columns:
- name: user_id
description: "The unique identified for each user"
```
You can read more about [adding Tables to Lightdash here](/guides/adding-tables-to-lightdash).
## Table configuration
You can customize how Tables look in Lightdash by adding configuration to your YAML file. Here's an example of most the properties you can use when defining a Table:
```yaml
models:
- name: users
meta:
label: 'App Users'
order_fields_by: 'label'
group_label: 'Mobile App'
sql_filter: ${date_dimension} >= '2025-01-01'
primary_key: user_id
joins:
- join: events
sql_on: ${users.user_id} = ${events.user_id}
relationship: one-to-many
required_attributes:
product_team: 'Mobile'
explores:
users_pii:
required_attributes:
has_pii_access: true
joins:
- join: users_pii
sql_on: ${users.user_id} = ${users_pii.user_id}
relationship: one-to-one
```
### Table properties
| Property | Value | Note |
| :-------------------------------------------------------- | :----------------- | :-------------------------------------------------------------------------------------------------------------------------------------- |
| label | string | Custom label. This is what you'll see in Lightdash instead of the Table name. |
| [order\_fields\_by](#order-fields-by) | `index` or `label` | How the fields will be sorted in the sidebar. [Read about the order rules.](#order-fields-by) |
| [joins](/references/joins) | array | Join logic to join other data models to the Table. [Read about joins.](/references/joins) |
| [metrics](/references/metrics#2-using-the-model-meta-tag) | object | Model metrics. [Read about model metrics](/references/metrics#2-using-the-model-meta-tag) |
| [group\_label](#group-label) | string | Group tables in the sidebar. [Read about the group label.](#group-label) |
| [sql\_from](#sql-from) | string | Overrides dbt model relation\_name |
| [sql\_filter](#sql-filter-row-level-security) | string | A permanent filter that will always be applied when querying this table directly. [Read about `sql_filter`.](#sql-filter) |
| [sql\_where](#sql-filter-row-level-security) | string | Alias for `sql_filter` |
| [required\_attributes](#required-attributes) | object | Limits access to users with those attributes. [Read about user attributes](/references/user-attributes) |
| group\_details | object | Describes the groups for dimensions and metrics |
| [default\_filters](#default-filters) | array | Dimension filters that will be applied when no other filter on those dimension exists. [Read about `default_filters`](#default-filters) |
| [explores](#explores) | object | Allows you to define multiple table explores in Lightdash from a single dbt model. |
### Adding a new dbt model
If you've added a new dbt model to your project, you need to do `dbt run` + `dbt refresh` before it will appear in Lightdash.
Lightdash gets information about your data models from dbt. But it gets information about the data ***generated*** by those data models from your data warehouse.
This means that if you add a new dbt model to your project or update a model so that you're making changes to the table it generates, then you need to do two things before your changes will appear in Lightdash:
1. **Materialize the new table or changes using dbt run.** You want the data in your data warehouse to be the new table you're expecting. So you need to do `dbt run` to update the table from the data model you just changed.
2. **Click Refresh dbt in Lightdash or run `lightdash refresh` in the CLI.** This will re-sync your dbt project in Lightdash so that changes you made to your dbt models are shown in Lightdash (e.g. adding a new table or column).
### Order fields by
By default, the fields in your sidebar for any table will appear alphabetically (`order_fields_by: "label"`). Sometimes, you might not want your fields to appear alphabetically, but instead, in the same order as they are in your YAML file. You can achieve this by setting the `order_fields_by` parameter in your table's meta tag to `index`, like this:
```yaml
models:
- name: users
meta:
order_fields_by: 'index'
columns:
- name: user_id
- name: user_name
- name: user_email
```
So, in the example above, the fields in the sidebar for "My Table" would appear in the order:
* user\_id
* user\_name
* user\_email
Instead of being listed alphabetically.
Here are some other things worth mentioning about the `order_fields_by` parameter:
* By default, `order_fields_by` is set to `label`, which means that your fields will appear in the table listed alphabetically.
* Since metrics can be declared in multiple places within your YAML (as a dbt metric, in the model `meta` tag, under a dimension's `meta`), we force the following order on metrics if you set `order_fields_by` to `index`:
* dbt metrics appear first
* then, metrics defined in the model's `meta`
* then, metrics defined in the dimensions' `meta`
* Group labels inherit the index of the first dimension that use them.
### Group label
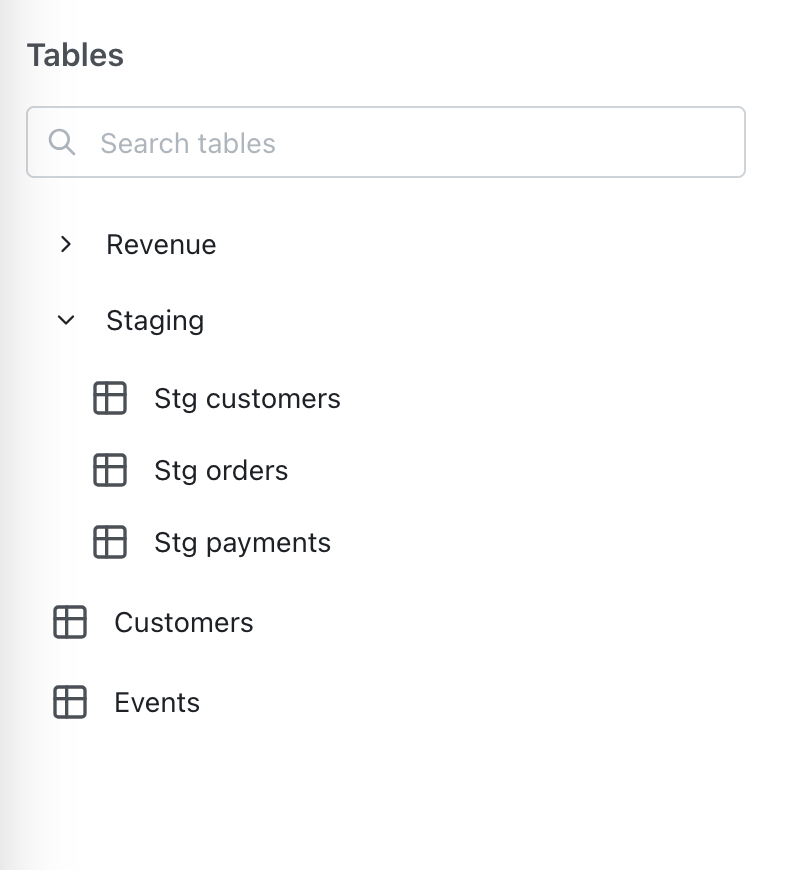
If you set this property, the table will be grouped in the sidebar with other tables with the same group label.
The tables in your sidebar will appear in the following order:
* Group labels appear first, alphabetically
* Ungrouped tables appear after the grouped tables in the sidebar, alphabetically
* Tables within the groups are also ordered alphabetically
### SQL from
`sql_from` is a configuration option that **overrides the default dbt model relation name** when generating SQL queries in Lightdash.
For example, you might use this if you want your Lightdash explore to query from a specific materialized view, a different schema, or include additional SQL logic in the FROM clause while still maintaining the dbt model structure for dimensions and metrics.
```yaml
models:
- name: sales
meta:
sql_from: my_schema.my_sales_view
```
### SQL filter (row-level security)
`sql_filter` adds a filter to the table that cannot be removed in Lightdash. It is automatically added to the compiled SQL when running queries.
For example:
```yaml
models:
- name: sales
meta:
sql_filter: ${TABLE}.sales_region = 'EMEA'
```
Any queries that I run using the `Sales` table in Lightdash will always have a filter for `sales_region = 'EMEA'` in their compiled SQL
```yaml
select [...]
from lightdash.prod.sales
where sales_region = 'EMEA'
```
##### Row-level security using user attributes
Using `sql_filter` with [user attributes](/references/user-attributes) allows you to set up [row-level security in your tables](/references/user-attributes#row-filtering-with-sql%5Ffilter). You can reference user attributes in your `sql_filter` using `${lightdash.attributes.my_attribute_name}`
For example:
```yaml
models:
- name: sales
meta:
sql_filter: ${TABLE}.sales_region IN (${lightdash.attributes.sales_region})
```
##### `sql_filter` will only be applied when querying tables directly.
For example:
* Table A is joined to Table B
* Table B has a `sql_filter` applied to it
* A user queries Table A and adds a field from the joined table (Table B) to their query
* the `sql_filter` from Table B will **not** be applied to the query (you would need to add this as a `sql_filter` to Table A directly for it to apply)
##### If you reference a dimension from a joined table in your `sql_filter`, the referenced table will always be joined in your queries.
For example:
* You have Table A which is joined to Table B
* In Table A, you've added a `sql_filter: ${TABLE}.sales_region = 'EMEA' OR ${table_b}.sales_region IS NULL`
* Table B will always be joined to Table A in your queries (even if there are no fields from Table B selected in your results table)
### Required attributes
Lightdash can use [user attributes](/references/user-attributes) to limit some tables to some users.
In the example below, only users with `is_admin` attribute `true` can use the `payments` table. Users without access to this table will not see it on the `tables page` or the `explore page` when joined to other tables.
```yaml
models:
- name: payments
meta:
required_attributes:
is_admin: "true"
```
If a user without access to this table runs a query that contains this table, they will get a `Forbidden` error.
## Default filters
Use `default_filters` to define filters on Dimensions that will be applied when no other user-defined filter on those Dimensions exists. Default filters will show apply to tables on load and can be populated with a pre-determined value. User them to suggest to users the kind of filters they might want to consider, or provide a default filtered view of a table that can be changed if needed.
An optional `required` flag can be added - in which case the filter *cannot* be removed. This can be particulalry useful if you have a large table and want to force users to filter on a partitioned date.
Below you can see there is a default filter with the optional required flag, that will have show the last 14 days of data by default.
```yaml
models:
- name: orders
meta:
default_filters:
- date: 'inThePast 14 days'
required: true
columns:
- name: date
description: 'Order date'
meta:
dimension:
type: date
```
A *required* filter's field reference can't be changed, but its operator (is, is not, etc.) and value can be changed when querying the table from the UI.
### If you have many filters in your list, they will be joined using `AND`
```yaml
- name: orders
meta:
default_filters:
- date: 'inThePast 14 days'
- status: "completed"
columns:
- name: date
description: 'Order date'
meta:
dimension:
type: date
- name: status
description: 'Order status - completed, pending, cancelled'
meta:
dimension:
type: string
```
In the example above, the `orders` table will have a default filter of `date` in the past 14 days **and** `status` completed. Both can be removed by the user, as the `required` flag is not present.
Note that we do also support a *legacy* structure for defining required filters, see below:
```yaml
models:
- name: orders
meta:
required_filters:
- date: 'inThePast 14 days'
columns:
- name: date
description: 'Order date'
meta:
dimension:
type: date
```
## Defining primary keys
You can specify a primary key for your model to uniquely identify each row. This is important for tables as it helps Lightdash understand the relationships between tables and prevent data duplication, especially when dealing with SQL fanouts in joins.
The primary key can be defined in two ways:
### Single column primary key
If your table has a single column that uniquely identifies each row, you can define it as a string:
```yaml
models:
- name: users
meta:
primary_key: user_id
```
### Complex primary key
If your table requires multiple columns to uniquely identify each row, you can define the primary key as an array of strings:
```yaml
models:
- name: order_items
meta:
primary_key: [order_id, item_id]
```
Using a properly defined primary key helps Lightdash optimize queries and provide accurate results when working with joined tables. It's especially important for preventing metric inflation in SQL joins where duplicate rows can lead to incorrect aggregations.
## Available filter types
| Type | Example (in English) | Example (as code) |
| :---------------------------- | :--------------------------------------------- | :-------------------------- |
| is | User name is equal to katie | user\_name: "katie" |
| is not | User name is not equal to katie | user\_name: "!katie" |
| contains | User name contains katie | user\_name: "%katie%" |
| does not contain | User name does not contain katie | user\_name: "!%katie%" |
| starts with | User name starts with katie | user\_name: "katie%" |
| ends with | User name ends with katie | user\_name: "%katie" |
| is greater than (number) | Number of orders is greater than 4 | num\_orders: "> 4" |
| in the past (date) (interval) | Date is before x (days / months / years) | date: "inThePast 14 months" |
| in the next (date) (interval) | Date is after x (days / months / years) | date: "inTheNext 14 days" |
| is greater than or equal to | Number of orders is greater than or equal to 4 | num\_orders: ">= 4" |
| is less than | Number of orders is less than 4 | num\_orders: "\< 4" |
| is less than or equal to | Number of orders is less than or equal to 4 | num\_orders: "\<= 4" |
| is null | Status is NULL | status: "null" |
| is not null | Status is not NULL | status: "!null" |
| is \[boolean] | Is complete is true | is\_complete: "true" |
| is not \[boolean] | Is complete is false or null | is\_complete: "!true" |
## Explores
You can define multiple table explores from a single table using the `explores` config. This will allow you to list the same dbt model multiple times in the list of Tables in Lightdash. You can use it to show different versions of a table, join different tables to the base table, customize table visibility, etc.
Below is an advanced example of using Explores. This will result in three total tables using the `deals` model at the base.
* **Deals** will not have any joins or limitations
* **Deals w/Accounts** will join to the `accounts` table and show all Accounts fields, but only people with the `is_exec` user attribute can see it
* **Deals w/Accounts (no Names)** will join to the `accounts` table and only show Industry and Segment dimensions, it has no access restrictions
```yaml
models:
- name: deals
meta:
primary_key: deal_id
explores:
deals_accounts:
required_attributes:
is_exec: "true"
label: 'Deals w/Accounts'
description: The deals table with the Accounts table details included
joins:
- join: accounts
relationship: many-to-one
sql_on: ${deals.account_id} = ${accounts.account_id}
deals_accounts_no_names:
label: 'Deals w/Accounts (no Names)'
description: The deals table with the Accounts table details included
joins:
- join: accounts
relationship: many-to-one
sql_on: ${deals.account_id} = ${accounts.account_id}
fields: [industry, segment, unique_accounts, unique_smb_accounts, unique_midmarket_accounts, unique_enterprise_accounts]
```
All the [table configuration options](#table-configuration) can be used under the `explores` tag.
[Read this guide to learn more about explores](https://docs.lightdash.com/guides/explores)